Feature Guide
Learn Mixar
Everything you need to know about Mixar's AI-powered 3D creation tools — from generating images and 3D models to layer-based texturing and conversational scene building. Have a question? Just ask Mixar directly in Ask Mode — it knows the entire documentation and can answer anything about the app.
Chat
The Chat interface is your conversational bridge to everything Mixar can do. Instead of hunting through menus and panels, describe what you want in plain language and Mixar handles the execution.
Ask Mode
A conversational Q&A mode for getting help, learning features, and understanding workflows — without executing any actions in your scene.
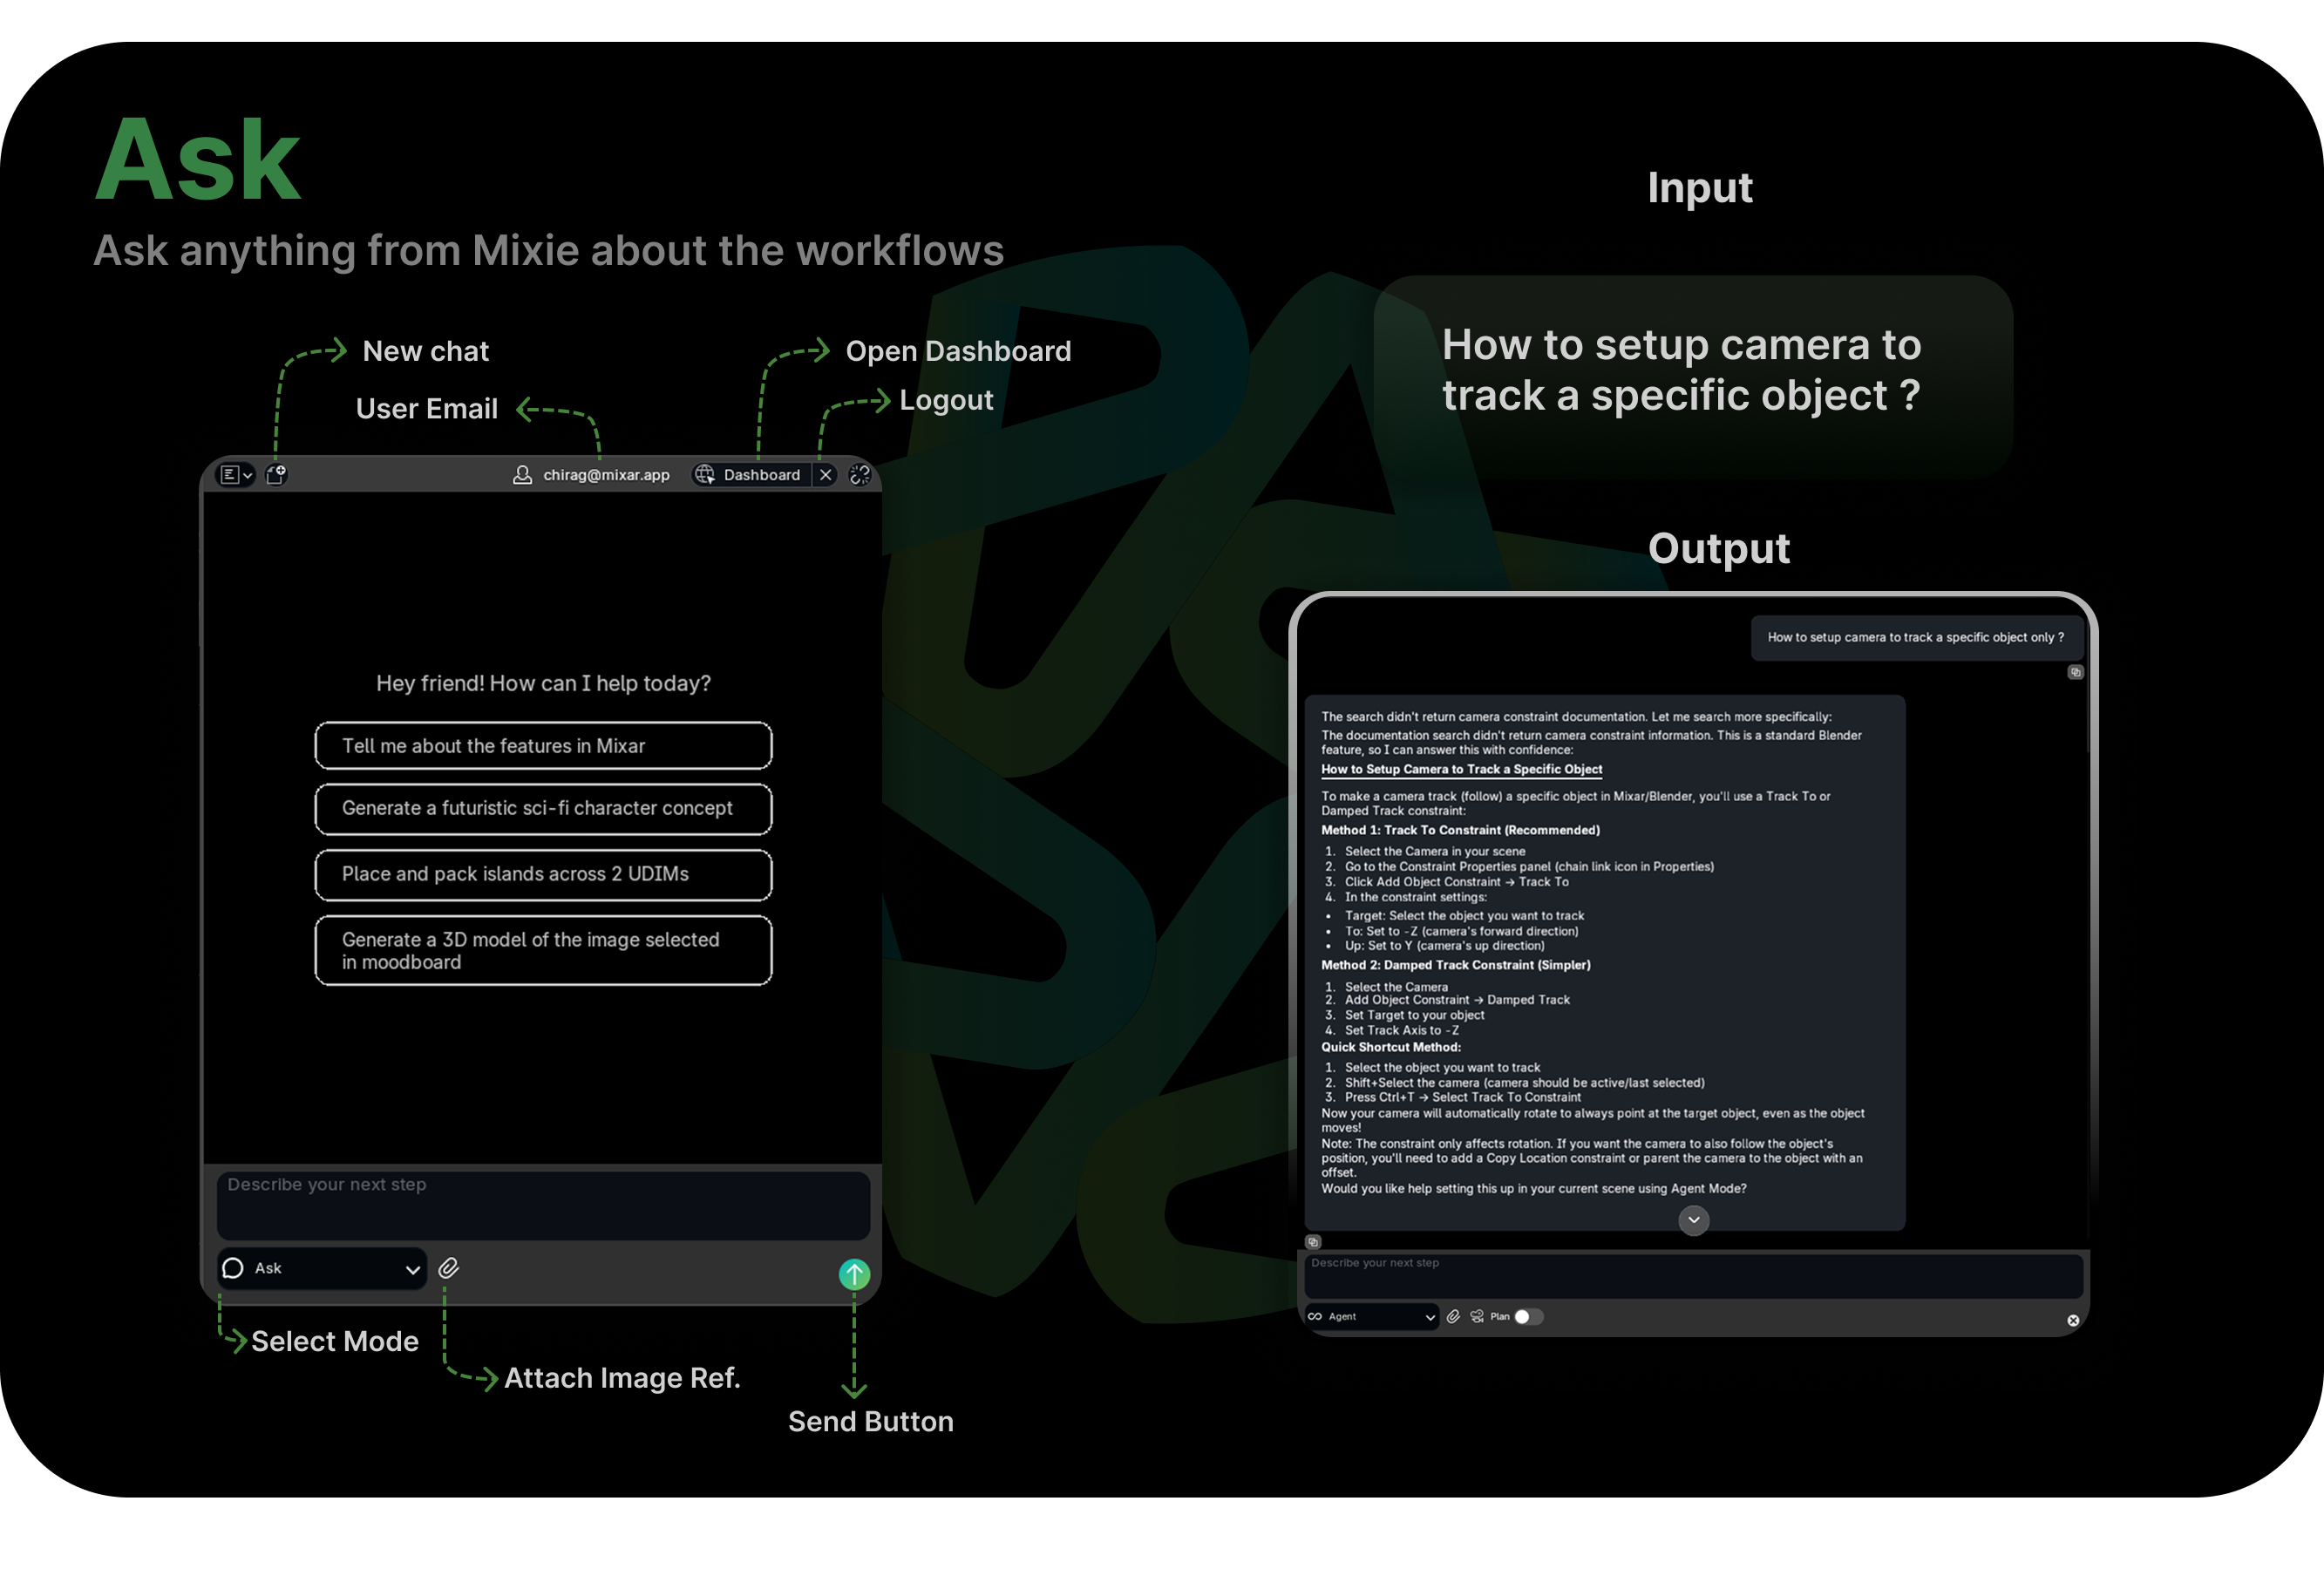
Ask Mode is your knowledge base. It searches Mixar's documentation and responds with relevant information, tips, and guidance. Nothing in your scene changes — it's purely informational.
What you can ask
- Feature questions — "How does UV packing work?" "What's the difference between Angle Based and Conformal unwrapping?"
- Workflow guidance — "What's the best way to texture a character model?"
- Tool explanations — "What does the Texel Density tool do?"
- Best practices — "What texel density should I use for a game asset?"
Good to know
- If you ask Mixar to perform an action in Ask Mode — like "create a cube" — it'll let you know that you need to switch to Agent Mode. Ask Mode is read-only by design.
Agent Mode
The execution mode. Tell Mixar what you want done, and it carries out the operations directly in your Blender scene.
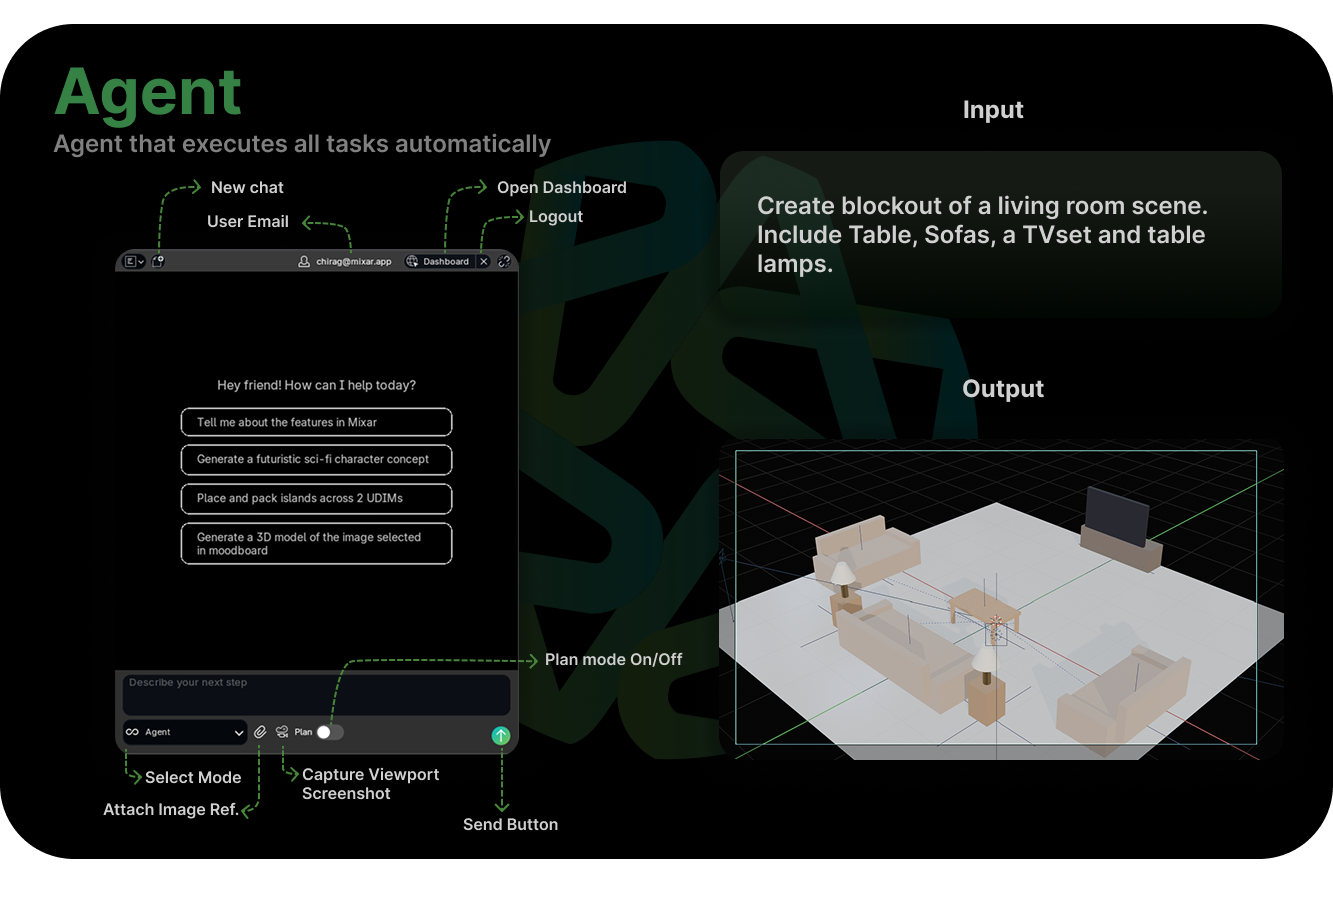
Agent Mode has access to a full suite of 3D tools — modeling, UV editing, texturing, scene setup, material creation, and more. You describe the task in natural language, and Mixar translates that into actual Blender operations.
What it can do
- Modeling — "Create a low-poly tree", "Bevel the edges of the selected object"
- UV editing — "Unwrap the selected mesh using Smart UV Project"
- Texturing — "Apply a brushed metal material to the selected object"
- Scene setup — "Add a three-point lighting setup", "Position the camera for a hero shot"
- Multi-step tasks — "Model a simple table, unwrap it, and apply a wood material"
How it works
- Type your request in the chat
- Mixar interprets your intent and determines which tools and operations to use
- Operations execute directly in your Blender scene
- You see the results immediately in the viewport
- Continue the conversation to refine — "make it taller", "try a different approach"
Agent Mode automatically switches between specialized tool sets (modeling, UV, texturing, scene, etc.) based on what you're working on.
Tips
- Be specific. "Make it look better" is hard to act on. "Increase the subdivision level to 3 and smooth the normals" gets exactly what you need.
- Agent Mode remembers context within your conversation. "Now do the same thing to the other object" will work.
- If something doesn't look right, just say so — "That's too many polygons, simplify it."
Plan Mode
For complex, multi-step tasks, Plan Mode lets you review and approve the execution plan before anything happens.
When you enable Plan Mode within Agent, Mixar doesn't immediately start working. Instead, it analyzes your request, breaks it down into a step-by-step plan, and presents it for your approval. Nothing executes until you say go.
How it works
- Enable Plan Mode when submitting your request
- Describe your task — for example: "Set up a product shot: create a circular pedestal, place the selected object on it, add a seamless backdrop, set up studio lighting with soft shadows, and position the camera for a 3/4 angle hero shot"
- Mixar analyzes the task and generates a detailed execution plan with each operation listed in order
- Approve to execute the full plan, or provide feedback to adjust it before execution
- Mixar executes the approved plan step by step
When to use it
- Complex multi-step workflows — Tasks where getting the order wrong would be costly
- Learning and transparency — When you want to understand exactly what Mixar will do
- Critical work — When you want to validate the approach before any changes are made
When to skip it
- For simple, quick operations — "add a cube", "delete the selected object" — Plan Mode adds unnecessary overhead. Just use regular Agent Mode.
Generate Mode
A specialized mode within Agent that gives you direct access to all of Mixar's AI generation capabilities through chat.
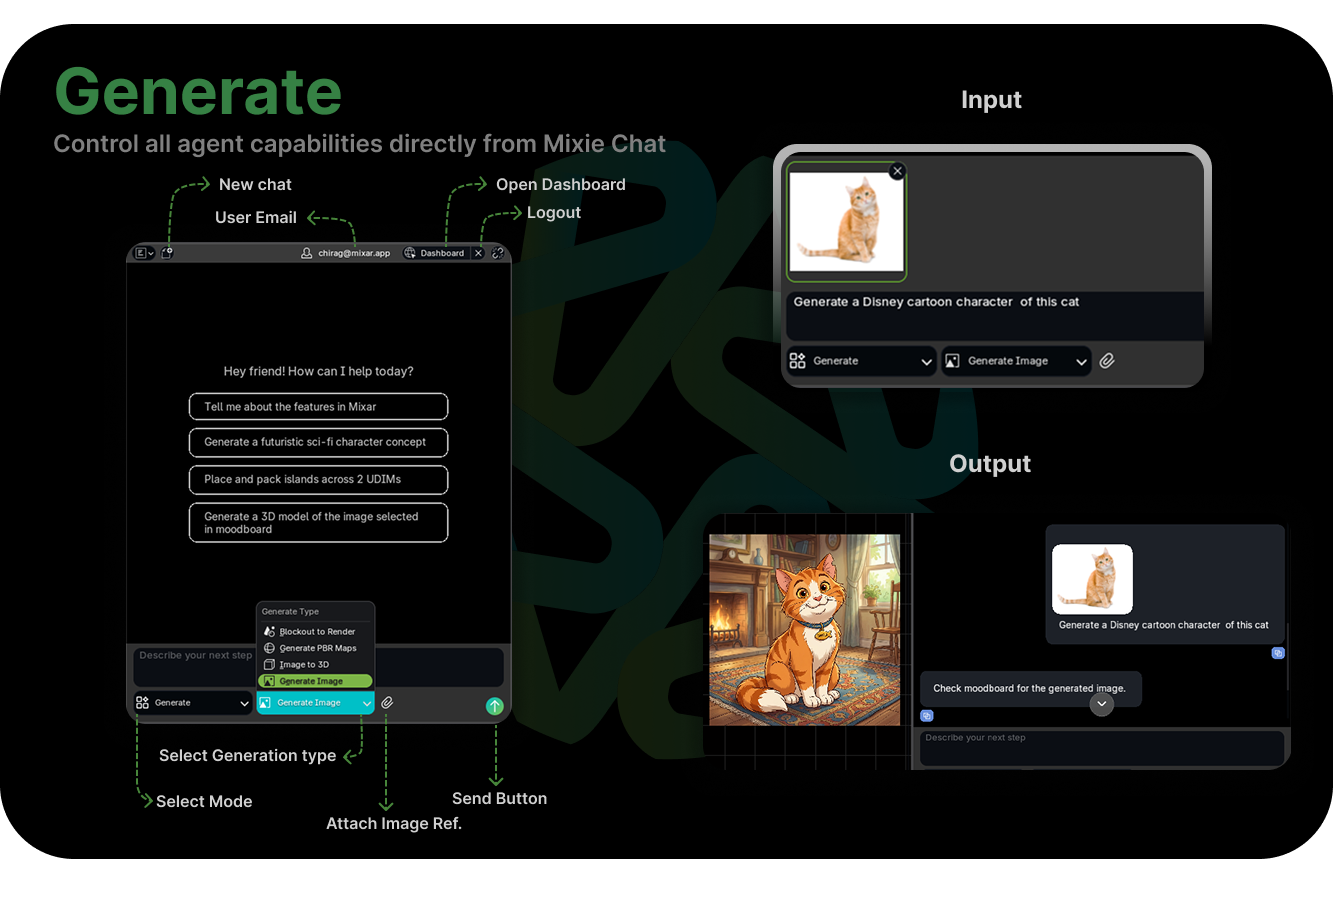
Generate Mode bundles all the Moodboard's AI functions into the conversational interface. Instead of selecting functions from the Moodboard UI, you describe what you want to generate in natural language.
Available generation tools
- Image Generation — "Generate a concept image of a medieval blacksmith's forge"
- Blockout to Render — "Render this blockout as a cyberpunk alley at night"
- PBR Map Generation — "Generate PBR textures for the selected mesh — aged bronze with verdigris"
- Image to 3D — "Convert the selected moodboard image to a 3D model"
Tips
- You can chain generations in conversation: "Generate a concept image of a crystal goblet" → "Now convert that to 3D" → "Generate PBR maps for it — frosted glass with gold trim"
Moodboard
The Moodboard is your starting point for AI-powered content creation. Import reference images, generate new ones, convert 2D concepts into 3D models, create PBR textures, and build entire scenes — all through a visual, image-centric workflow.
Getting Started
The Moodboard is a 2D canvas where you collect and arrange reference images, kick off AI generation workflows, and receive generated results. Everything starts here.
Adding Images
- Open Image — Click the folder icon in the left toolbar to browse for files. Supported formats: .png, .jpg, .bmp, .tga, .tiff, .webp
- Drag & Drop — Drag one or more image files directly onto the moodboard canvas
- Add Existing Image — Add an image already loaded in Blender via the same folder icon's popover menu
Selecting Images
- Click — Select a single image. Click empty canvas to deselect.
- Shift+Click — Add to selection
- Box Select — Click and drag on empty canvas to select multiple images by region
- A — Select All / Deselect All
Transforming Images
- G — Grab and move selected images interactively
- R — Rotate freely
- S — Scale
- Confirm a transform with Left-click or Enter; cancel with Right-click or Esc
- Right-click for Rotate 90°, Flip Horizontal, Flip Vertical, and Duplicate
Toolbar
- Add Image (folder icon) — Open images from disk or add existing Blender images
- Mask Tools — Reveals Box Mask and Magic Select for AI-powered object segmentation. Used by Segment to 3D workflows. Only active when an image is selected.
- Add Text — Place an annotation label anywhere on the canvas
- Rotate 90° — Instantly rotate selected images clockwise
- Send to Chat — Transfer selected images to the Chat panel as attachments. Shortcut: Cmd+P (Mac) / Ctrl+P (Windows/Linux)
Send to Chat
Select one or more moodboard images and press Cmd+P (Mac) or Ctrl+P (Windows/Linux) to attach them to the Chat input. This is how you reference specific moodboard images in an Agent Mode or Generate Mode conversation — for example, "convert this image to 3D" while the image is attached.
Groups
Select two or more images, then right-click → Group to link them together. Grouped images move and transform as a unit, and sending any image from a group to Chat automatically includes all other group members.
Exporting Images
Right-click a selected image → Export Images to save it to disk as a .png file. You can export multiple selected images at once.
Quick-Access Pie Menu
Press Tab or ` (backtick) anywhere on the moodboard to open a radial pie menu with direct shortcuts to all AI generation features — Image Generation, PBR Maps, Image to 3D, Segment to 3D, Generate Scene, and more.
Image Generation
Turn text descriptions into images, or create variations from existing references.
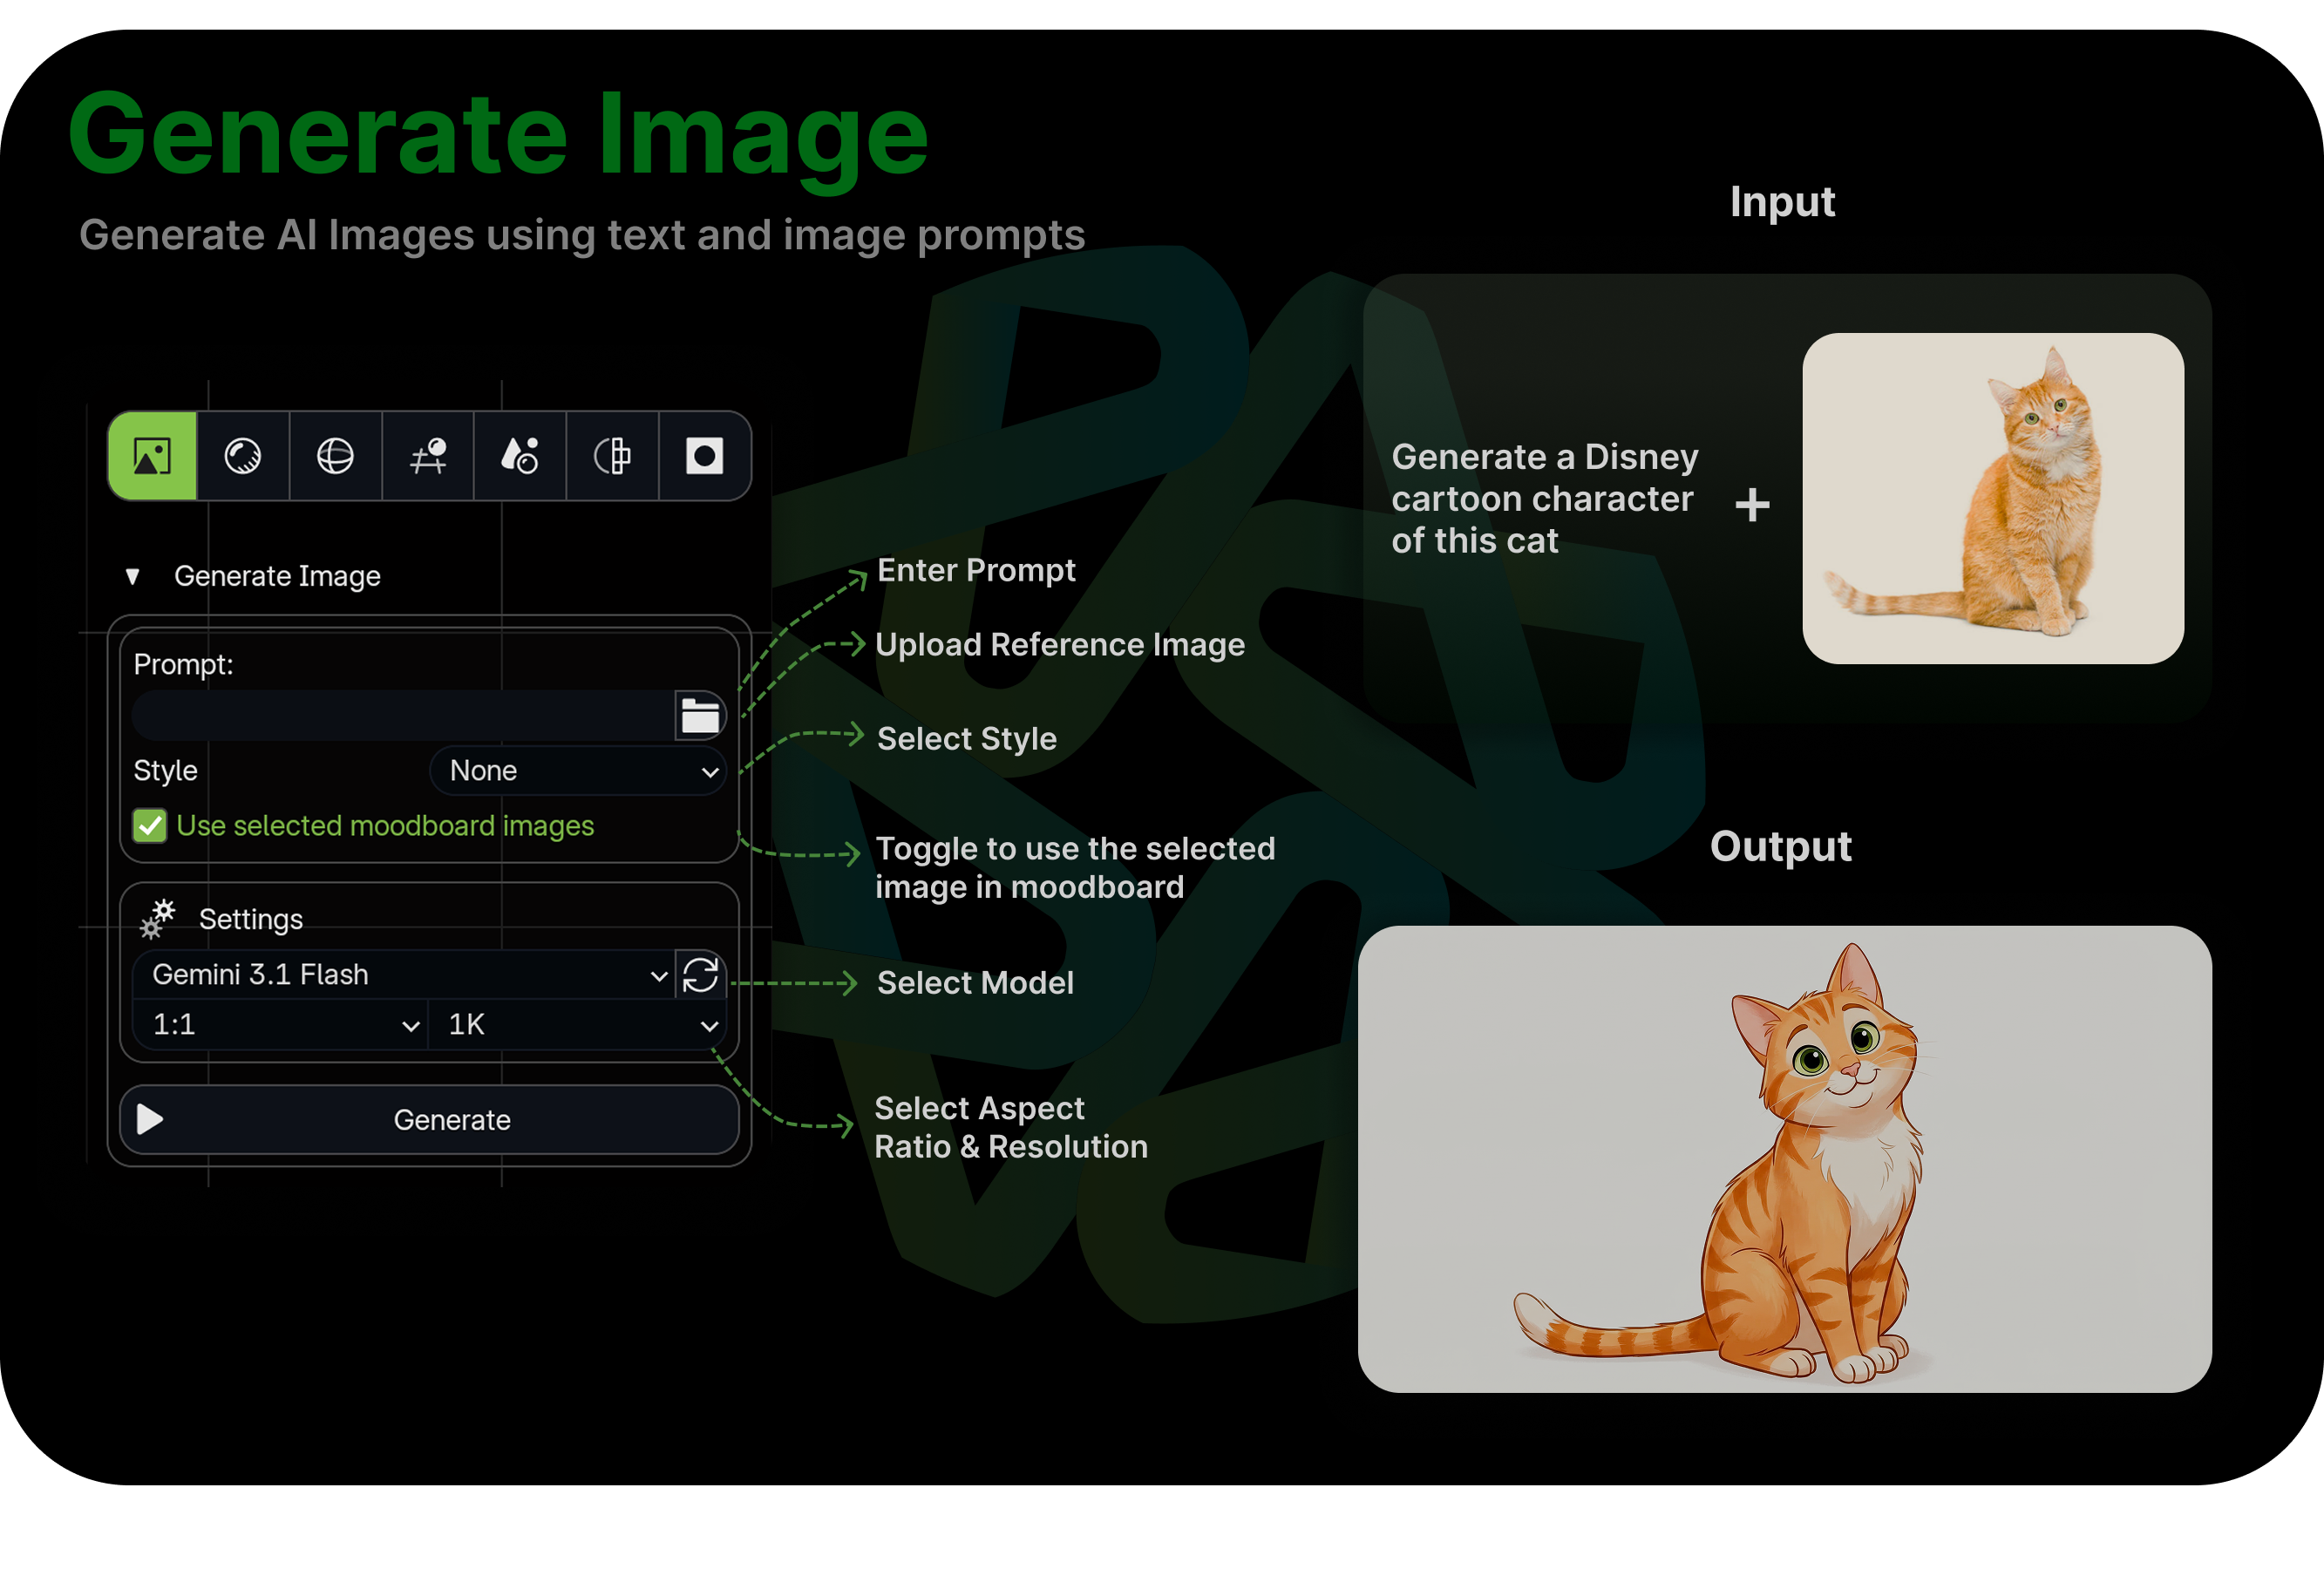
How it works
- Open the Moodboard panel in AI Mode
- Select Image Generation from the AI function menu
- Type a prompt describing what you want — for example: "weathered sci-fi cargo crate, metallic surface with dents and rust patches, studio lighting"
- Optionally select reference images from your moodboard to guide the style, composition, or subject
- Choose your quality tier:
- Fast — Good for quick iterations and concept exploration
- Pro — Higher quality output with more control over resolution and aspect ratio. Supports up to 4K, wider aspect ratios, and up to 14 reference images
- Generated images appear in your moodboard, ready to use as references, textures, or input for other AI functions
Tips
- Use specific, descriptive prompts. Instead of "a sword," try "a fantasy longsword with ornate gold crossguard, dark leather grip, glowing blue runes on the blade."
- Feed in reference images alongside your prompt to get closer to a specific style
- Generate multiple variations and pick the best one — iteration is fast and cheap
- Generated images can immediately be used as input for Image to 3D, PBR Map Generation, or any other moodboard function
Blockout to Render
Turn rough 3D blockouts into polished concept renders without spending hours on materials, lighting, and rendering.
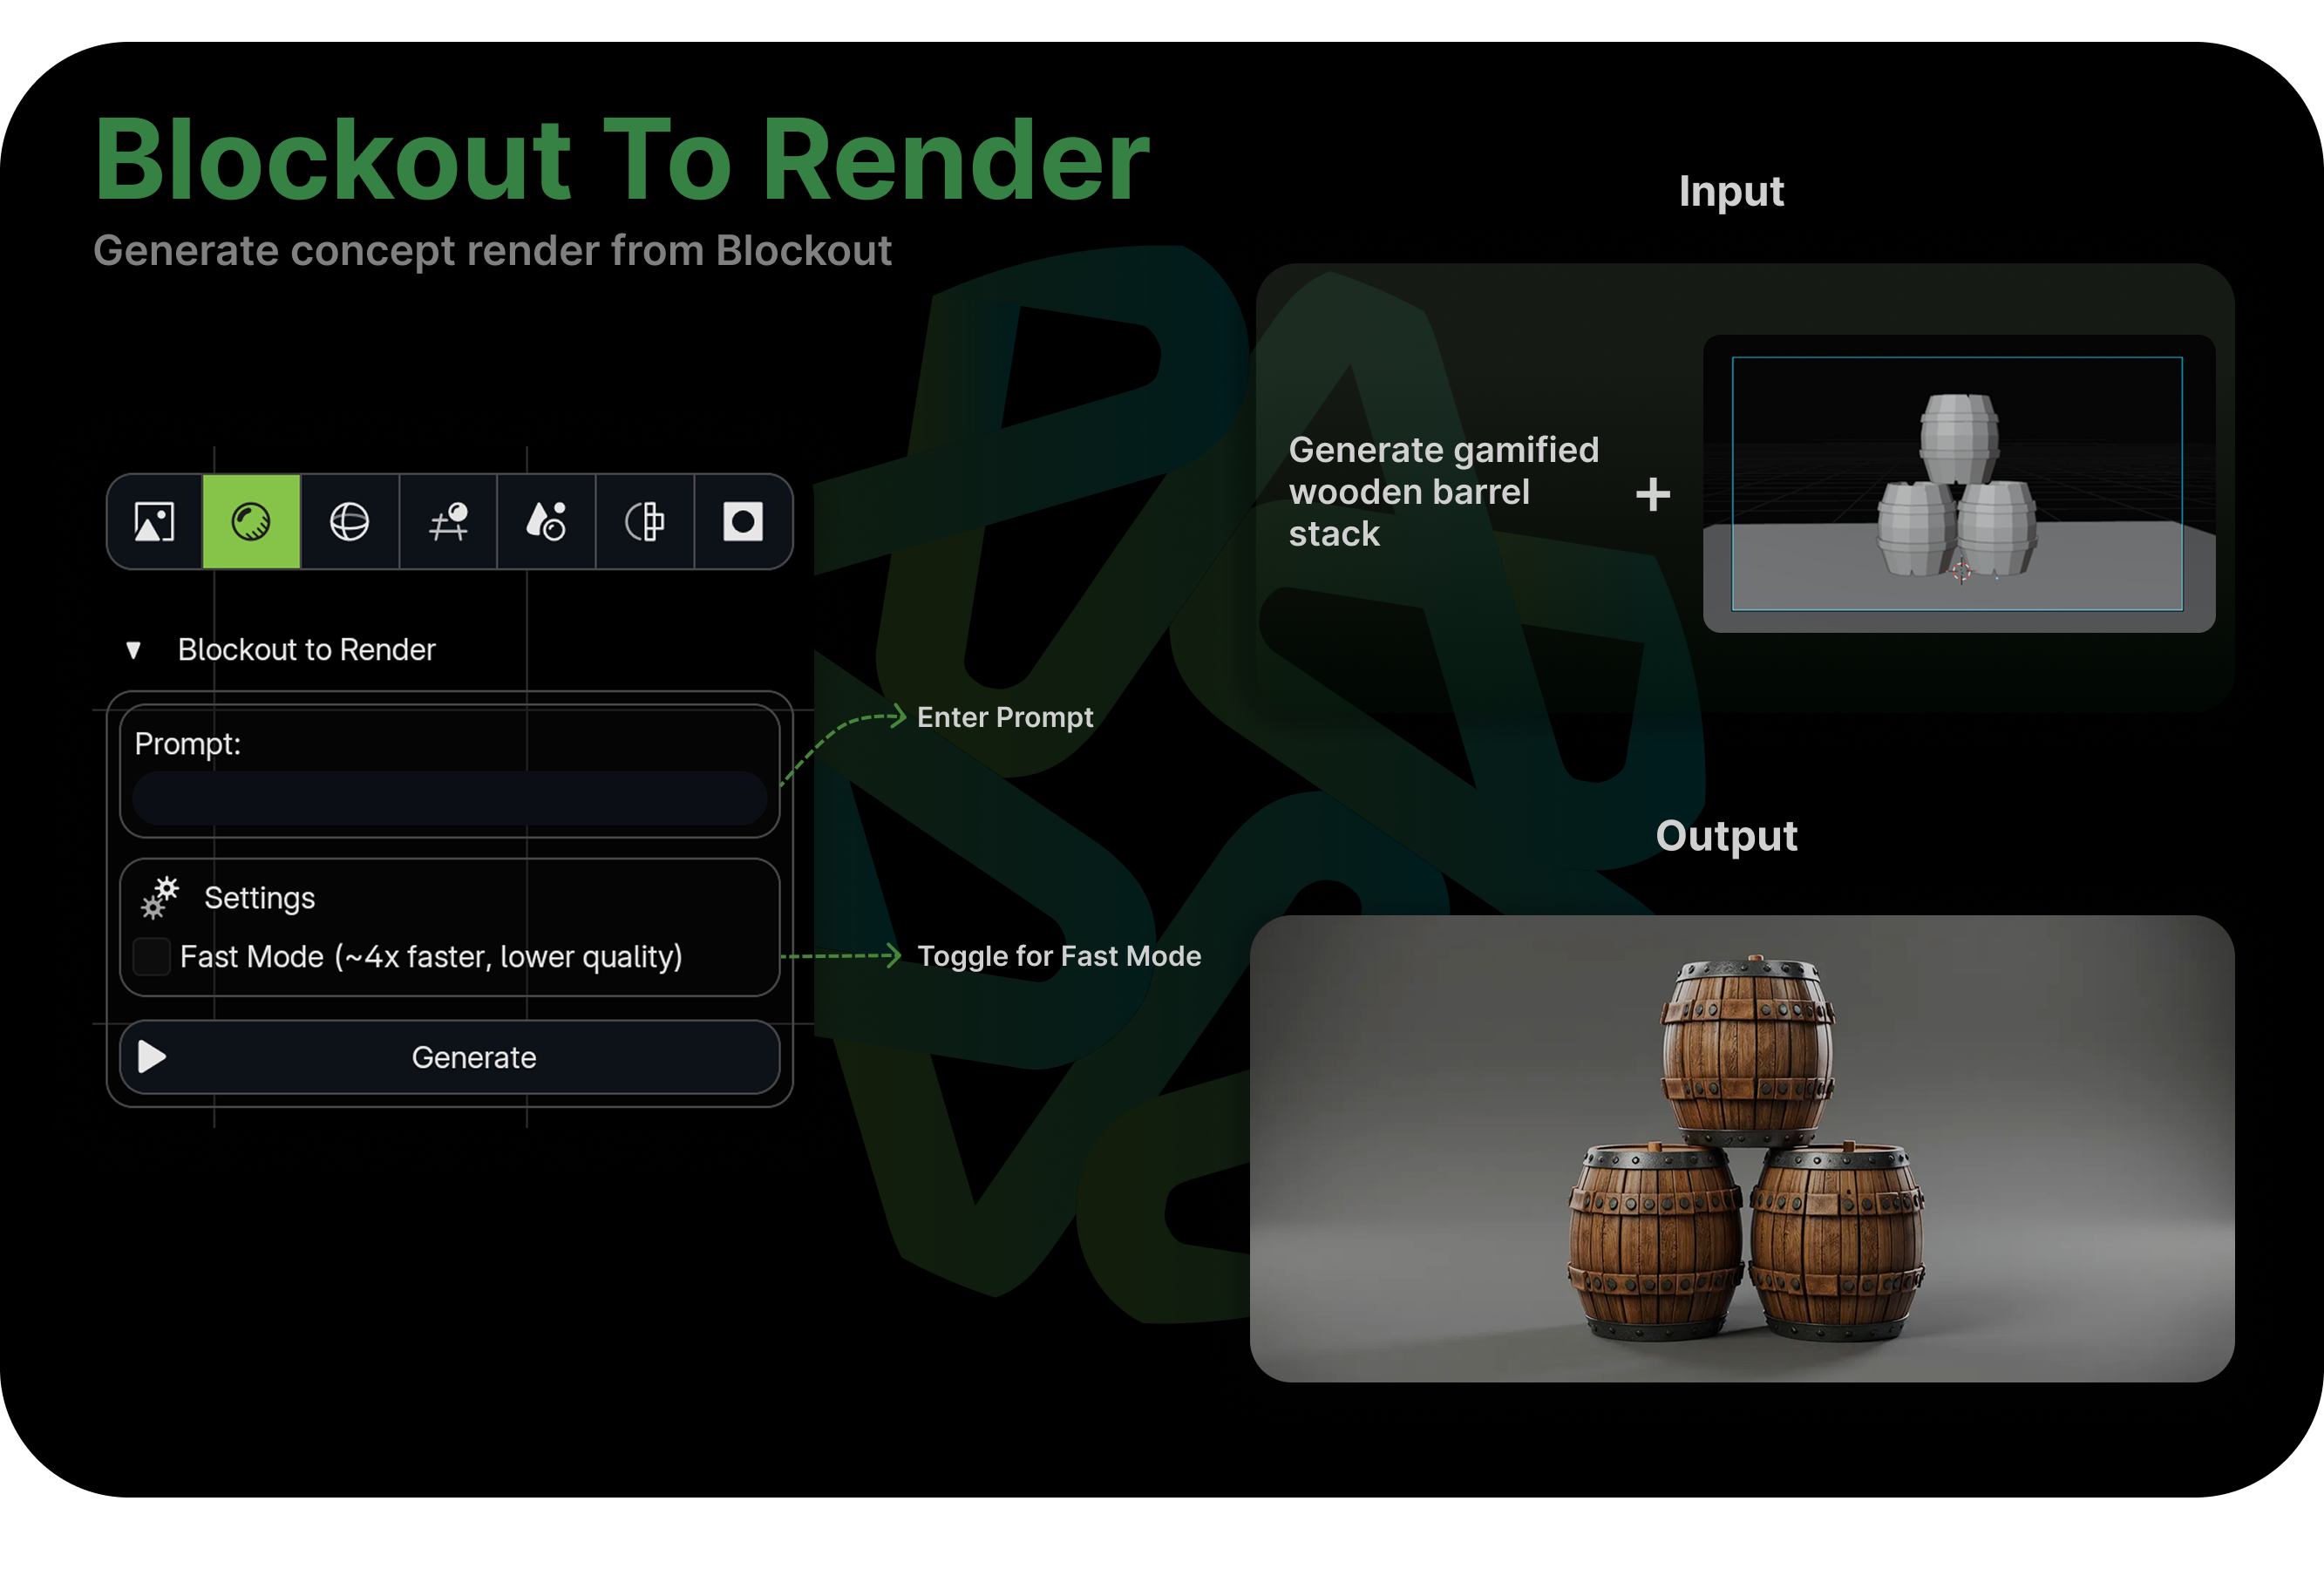
This feature bridges the gap between the "gray box" phase of 3D work and a finished-looking image. If you've ever built a quick composition out of primitives and wished you could instantly see what it would look like fully rendered — this is exactly that.
How it works
- Build a rough scene in the 3D viewport using basic shapes — cubes, cylinders, spheres, or any geometry. This is your blockout.
- Position your camera to frame the composition you want
- Select Blockout to Render from the moodboard
- Write a prompt describing the visual style — for example: "ancient stone temple interior, overgrown with vines, volumetric light shafts through broken ceiling"
- Mixar captures a depth image of your viewport (preserving 3D structure and spatial relationships) and uses it as a structural guide for AI image generation
- The result is an image that respects the geometry and composition of your blockout while applying the style, materials, lighting, and atmosphere from your prompt
When to use it
- Early concept exploration — Block out a scene in minutes, then generate multiple style variations before committing to detailed modeling
- Client presentations — Turn a rough layout into a convincing visual without a full production pipeline
- Composition testing — Quickly validate camera angles and spatial arrangements
- Art direction — Generate style targets for your team based on actual 3D layouts
Tips
- The quality of your blockout matters. Even simple geometry communicates scale, depth, and spatial relationships that the AI will preserve.
- Try the same blockout with different prompts to explore wildly different styles from one layout
- Use the generated images as painting references or texture projections later in your pipeline
PBR Map Generation
Generate a complete set of PBR texture maps for any mesh directly from a reference image or text description.
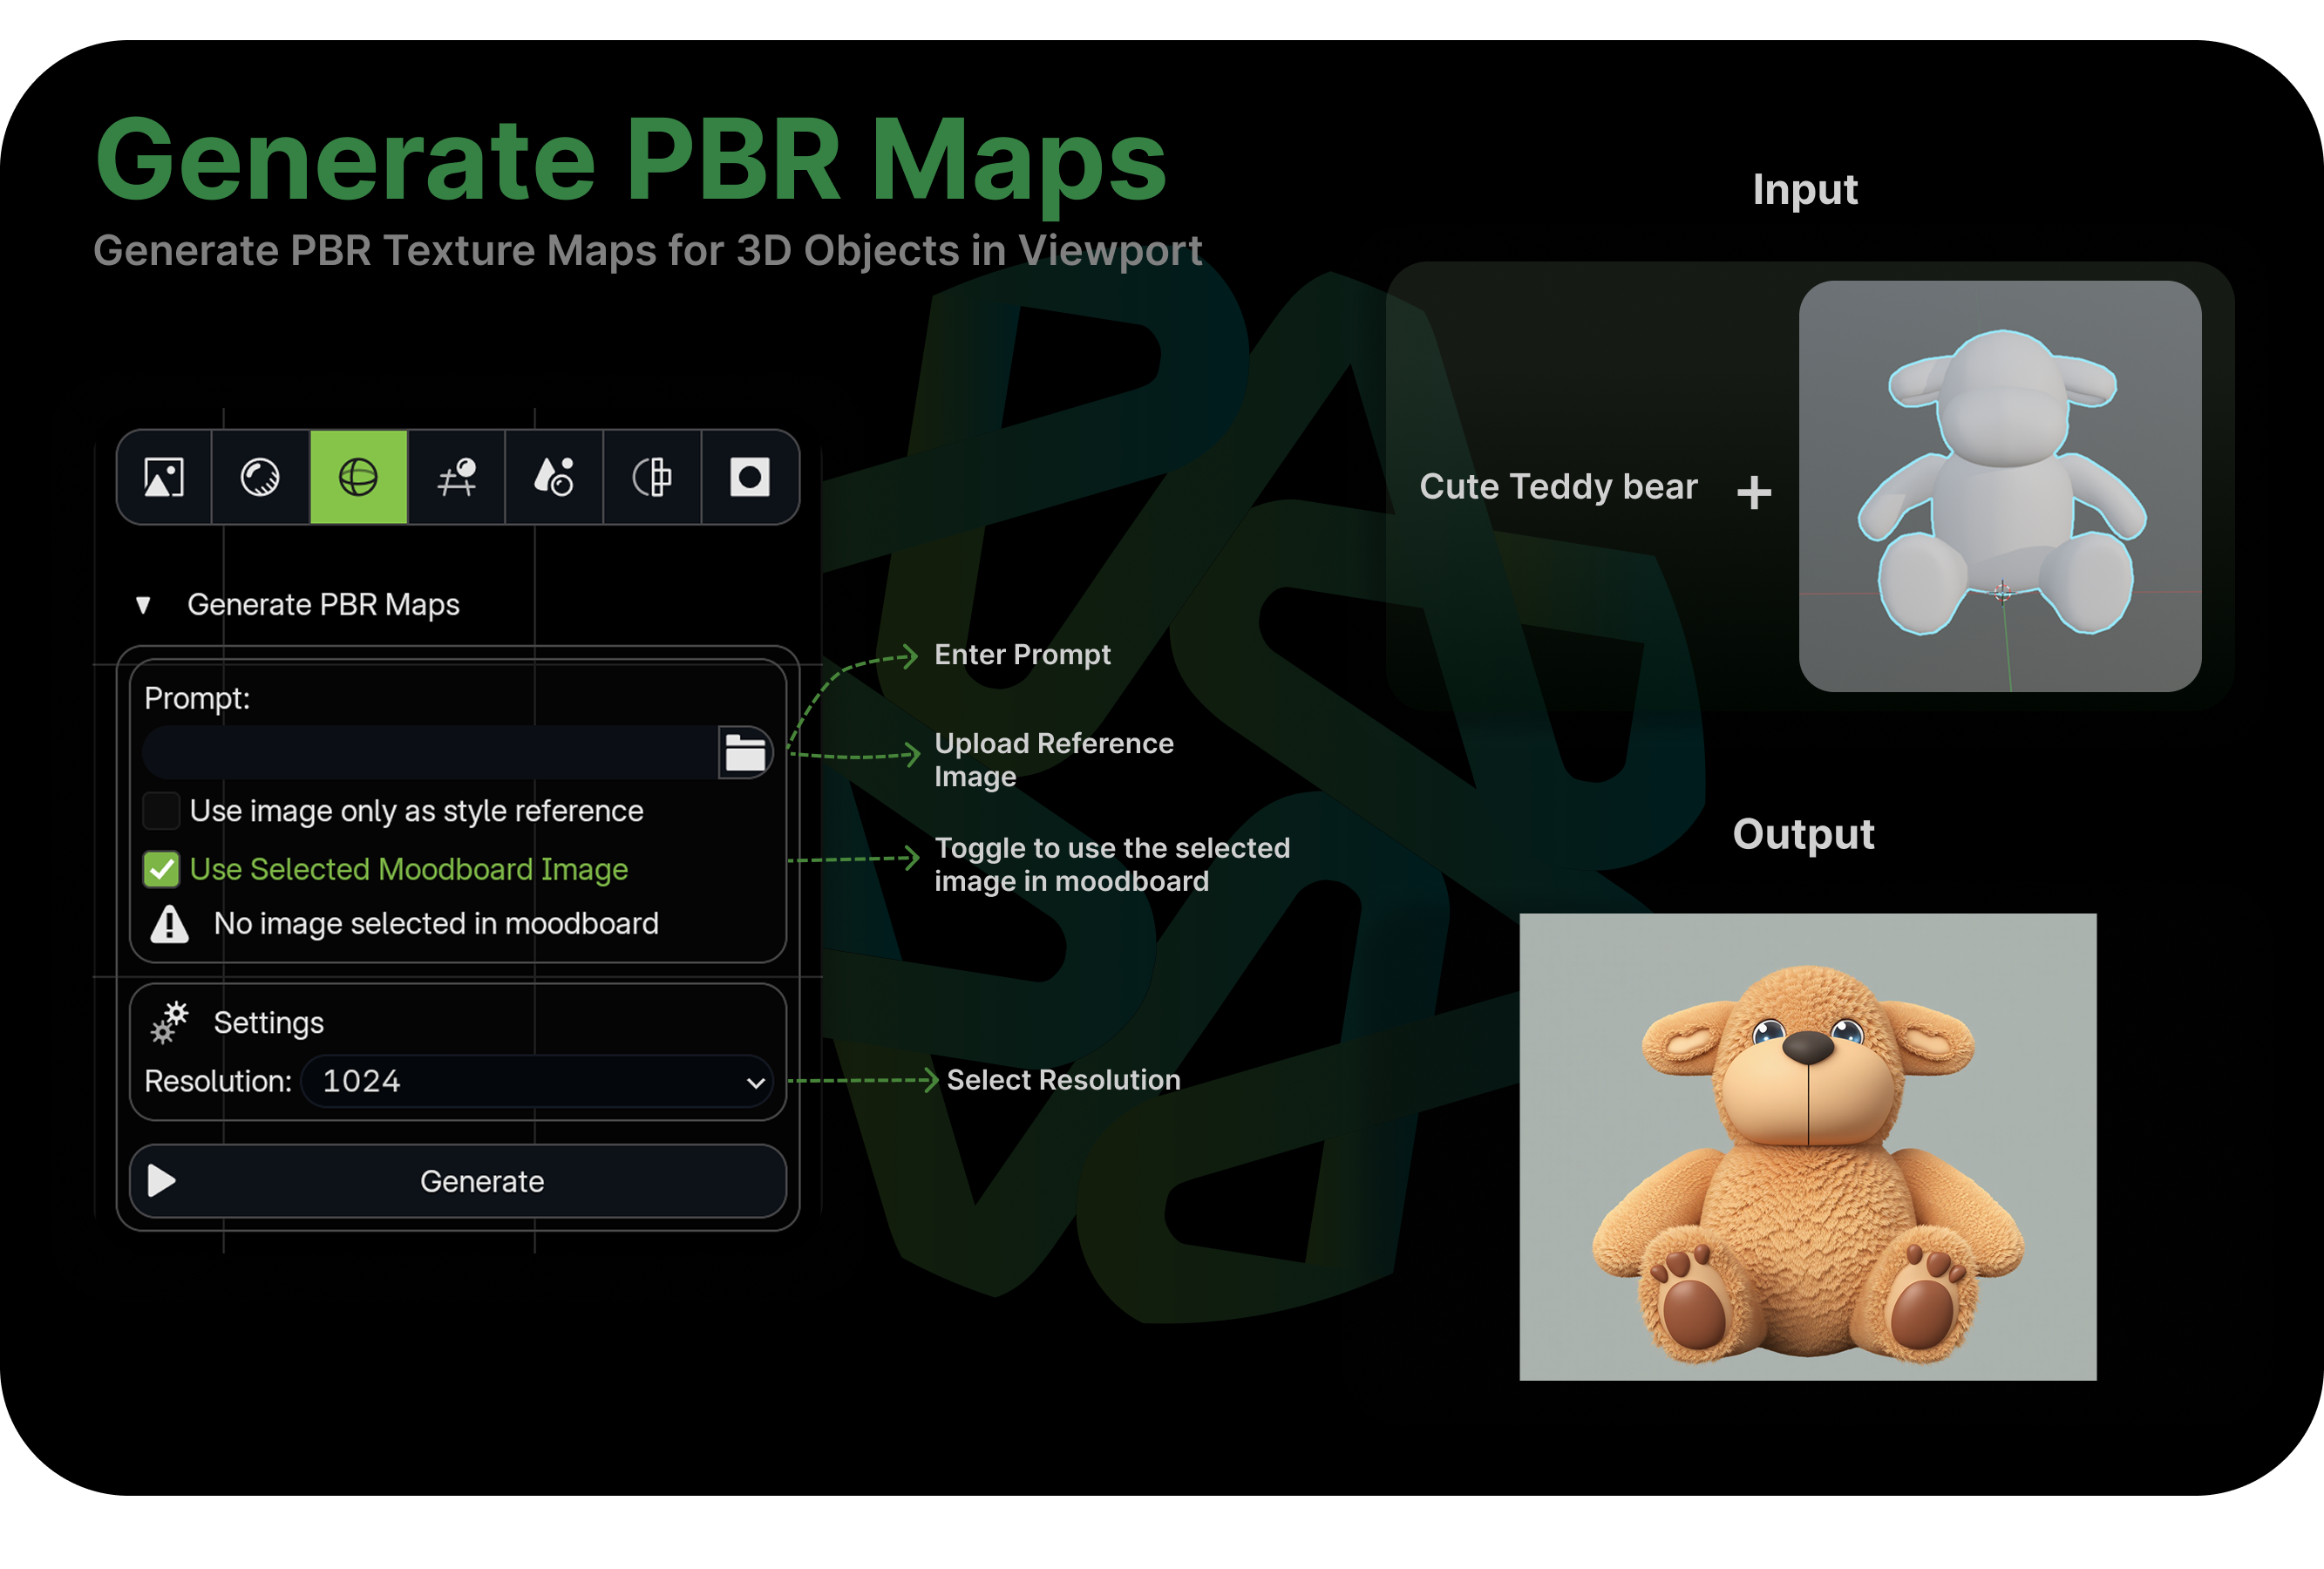
Instead of manually authoring every map in a texturing application, PBR Map Generation analyzes your input and produces a full material — Base Color, Roughness, Metallic, and Normal maps — applied directly to your object.
How it works
- Select the mesh you want to texture (it must have UV coordinates — unwrap first if needed)
- Select PBR Map Generation from the moodboard
- Provide a material description or select a reference image — for example: "hammered copper with green patina, aged"
- Mixar generates four PBR maps: Base Color, Roughness, Metallic, and Normal
- The maps are automatically connected to a material and applied to your selected objects
When to use it
- Rapid prototyping — Get a textured look on your model in seconds
- Material exploration — Try different materials on the same mesh quickly
- Base layer for manual texturing — Use AI-generated maps as a starting point, then refine in Layer Painting
- Game-ready textures — Output maps are standard PBR and compatible with any modern renderer or game engine
Tips
- Make sure your mesh has clean UVs before generating. Poor UV layout will result in poor texture quality.
- Be specific with your material prompts. "Metal" is vague — "brushed stainless steel with fingerprint smudges" gives much better results.
- You can generate PBR maps from photos too. Upload a close-up photo of a real material, and Mixar will extract all four PBR channels from it.
Image to 3D
Convert a 2D image into a full 3D model, complete with geometry and textures.
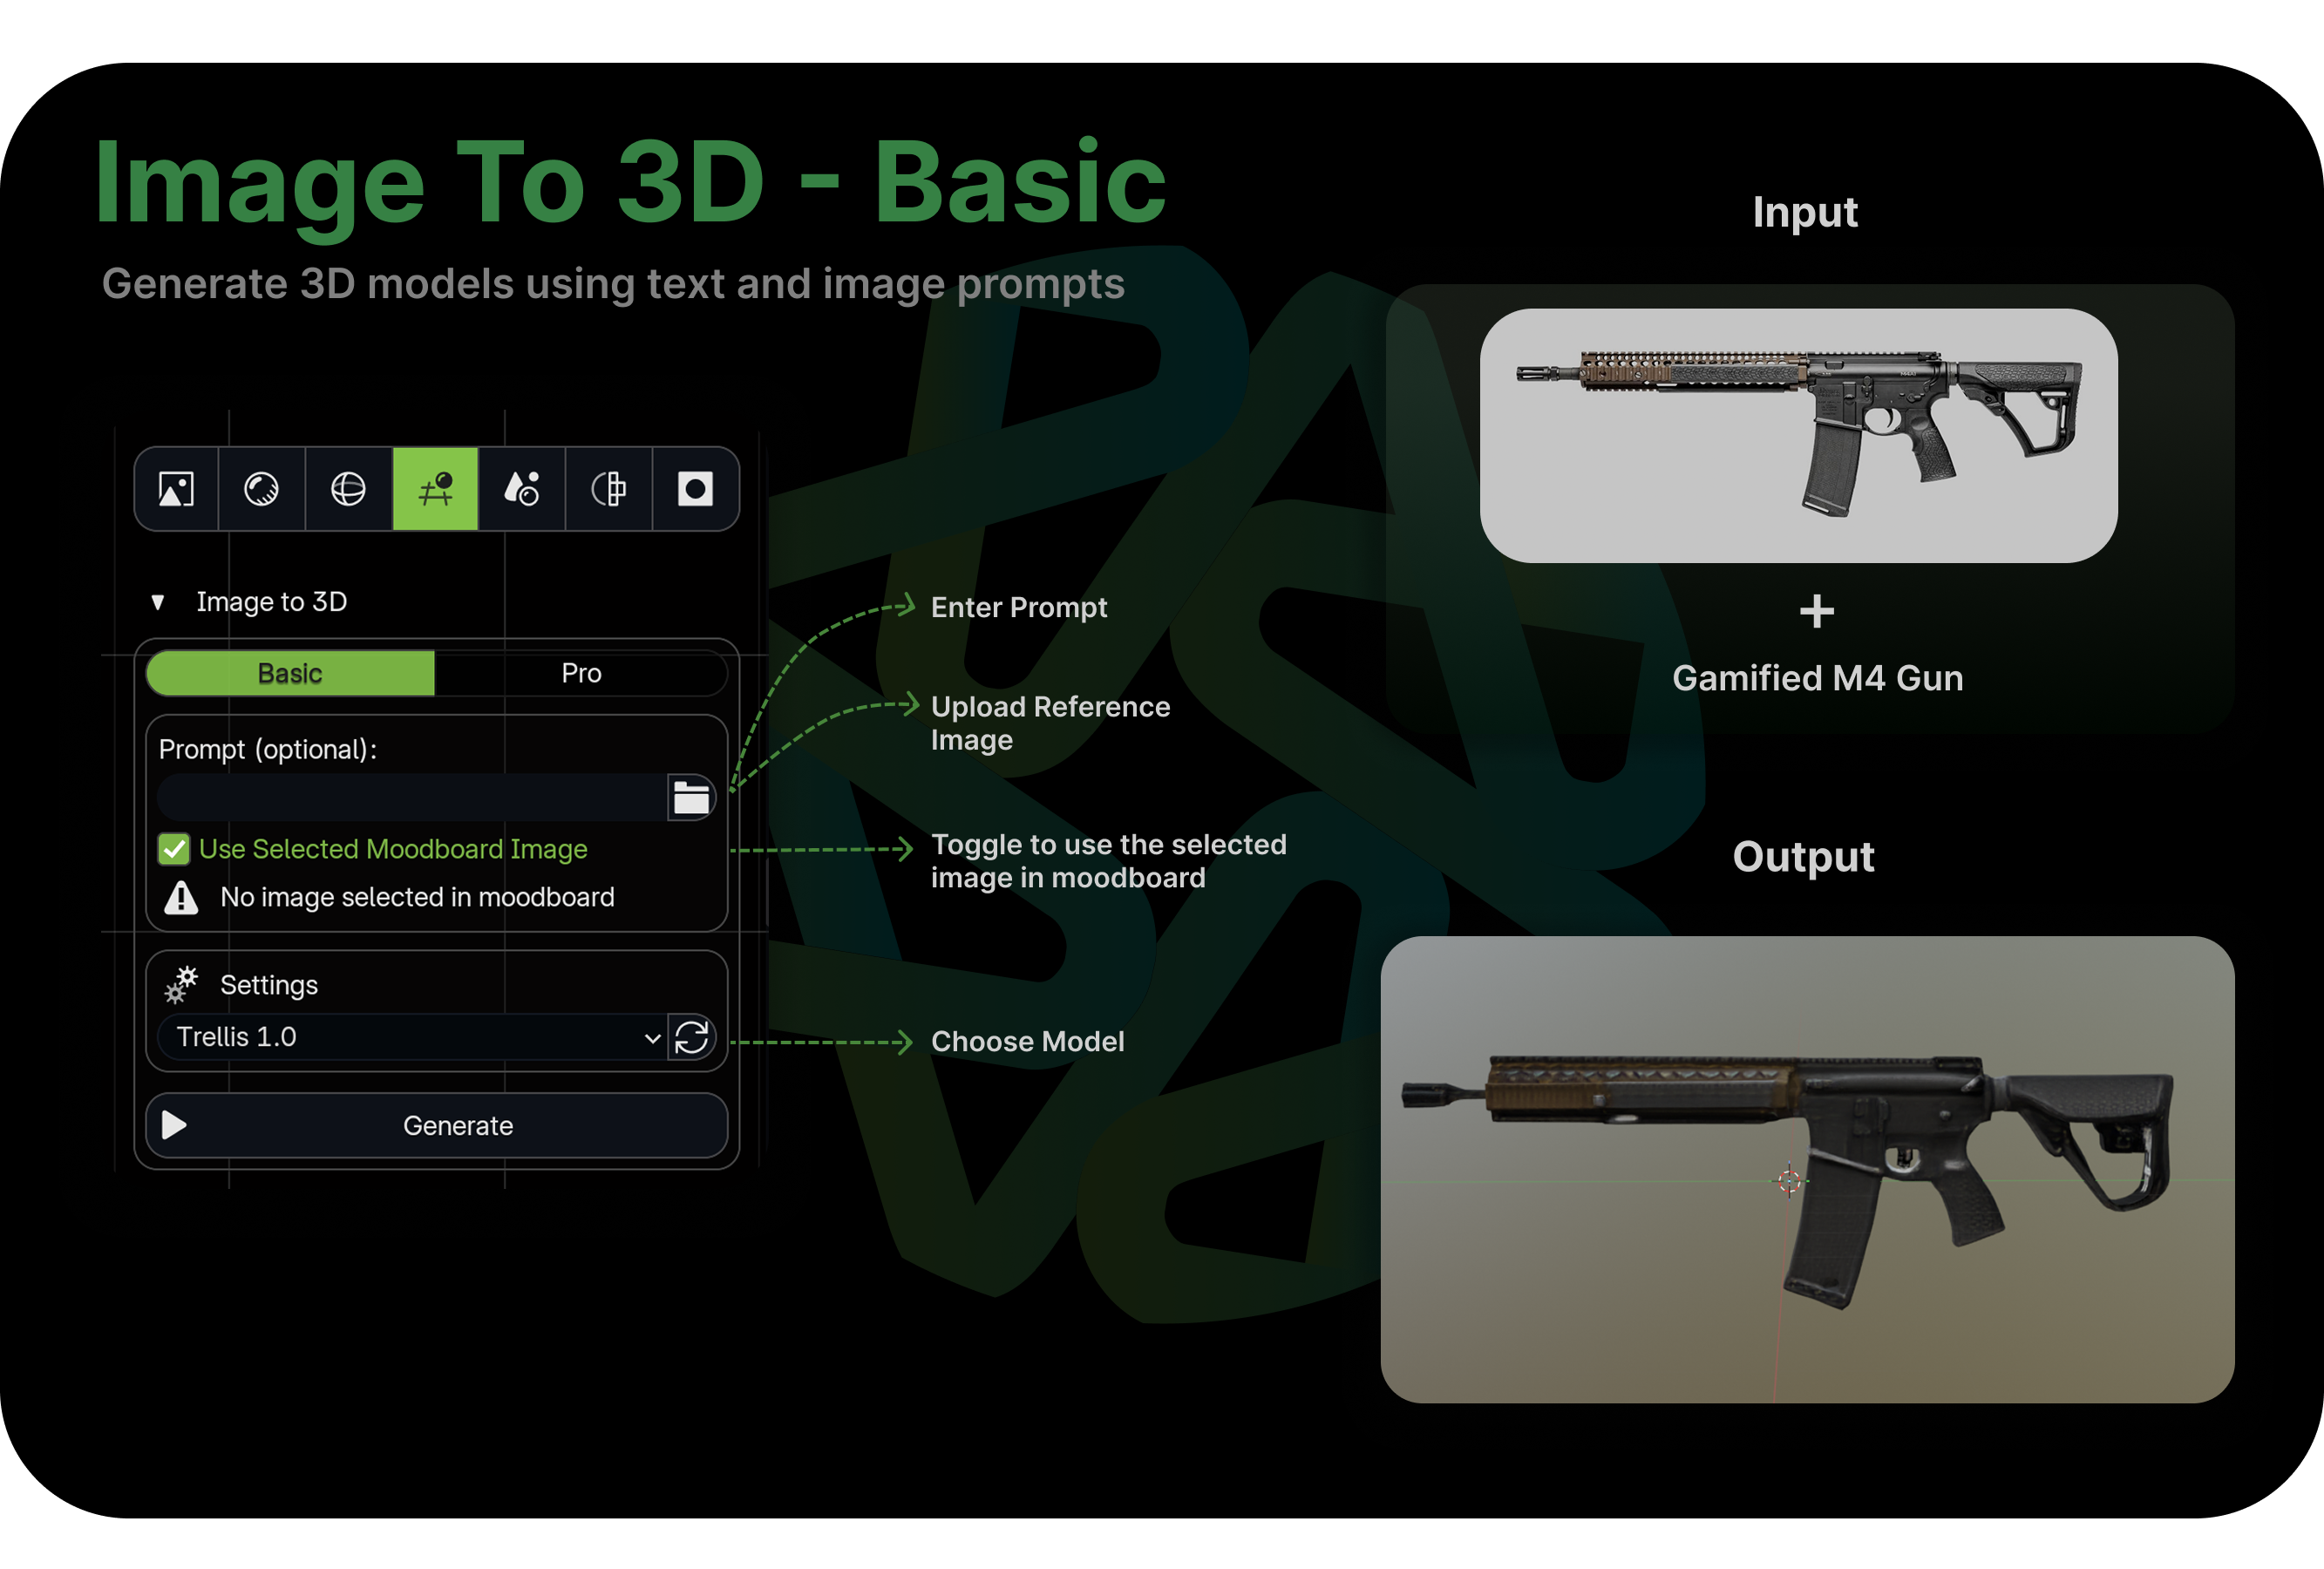
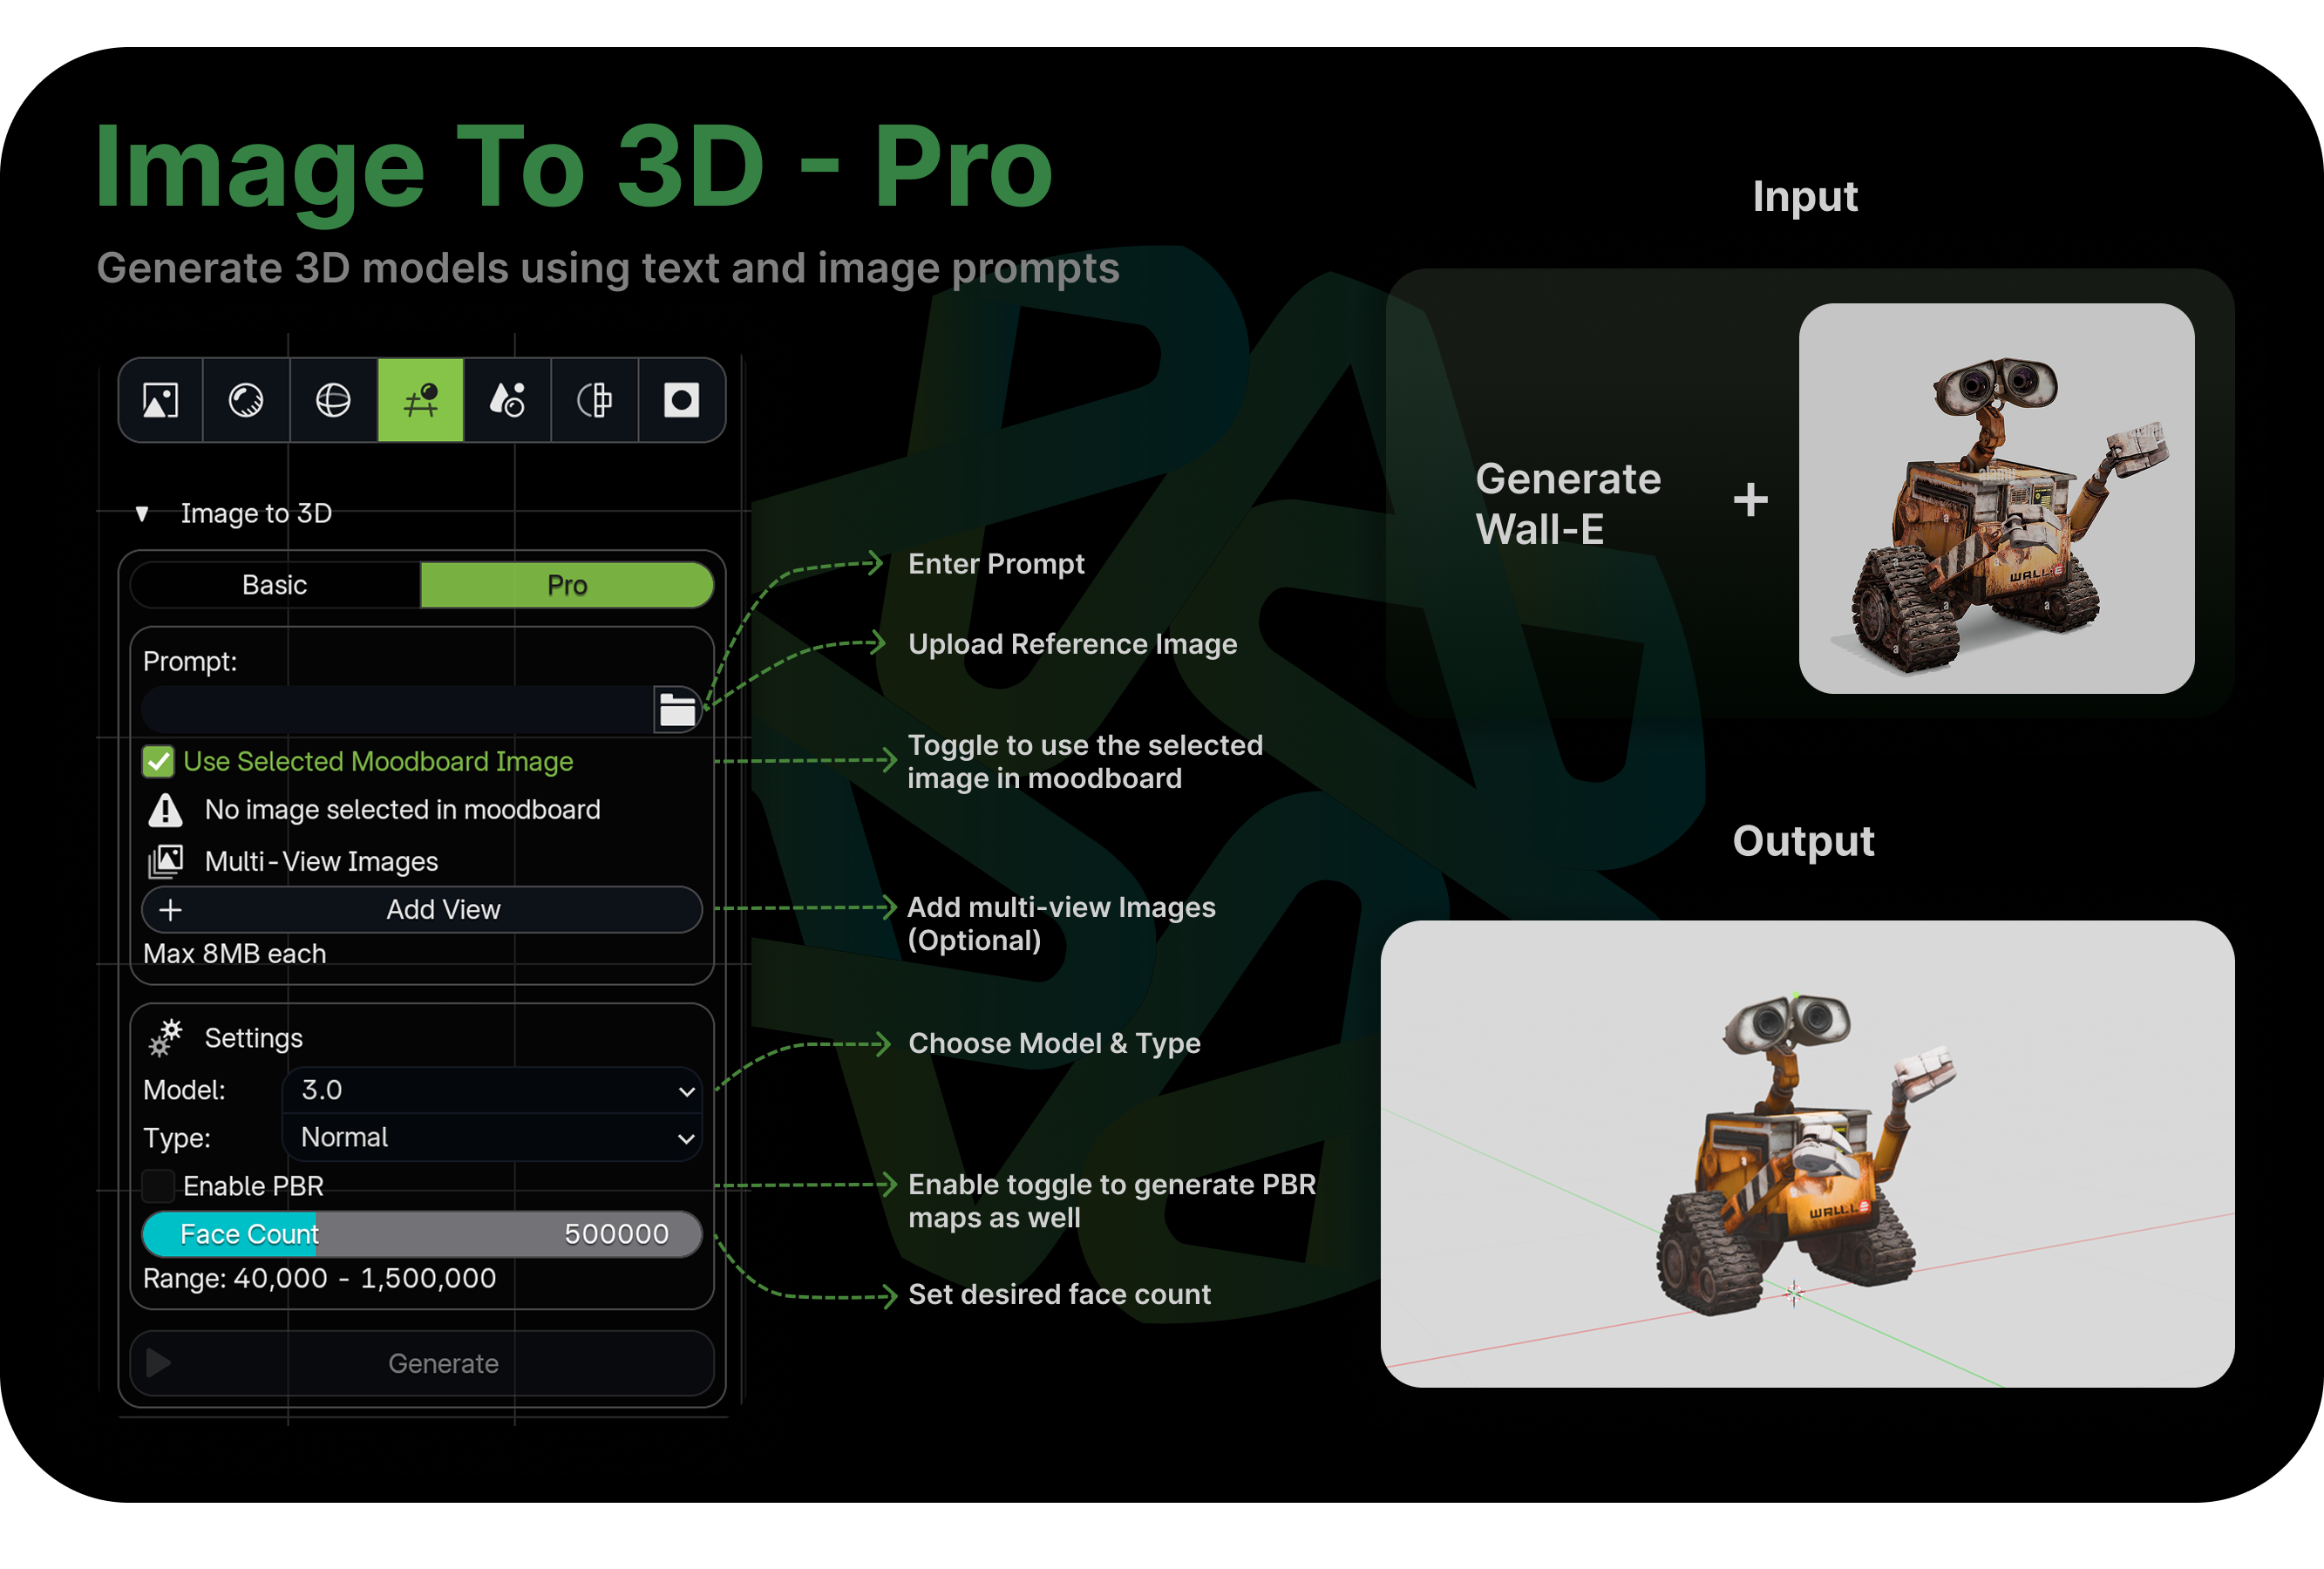
Take any concept art, photo, or AI-generated image and turn it into a 3D mesh you can immediately work with — edit the topology, adjust the form, apply new materials, or drop it into a scene.
Tiers
- Basic — Text prompt (optional) plus an input image. Best for quick, straightforward conversions
- Pro — Advanced output with multi-view support (up to 8 reference views), face count control (40k–1.5M polygons), PBR texture output, and model version selection. Use this when accuracy and quality matter most
How it works
- Add your source image to the moodboard (drag and drop or import from disk)
- Select the image and choose Image to 3D from the AI function menu
- Pick a tier — Basic, or Pro
- Configure output settings — AI model, and for Pro: face count and polygon type
- Start the generation. Basic gives you different AI models to choose from; Pro takes the longest but produces the highest quality result
- Once complete, the 3D model is automatically imported into your Blender scene
What to expect
Output quality depends heavily on the input image. Clean, well-lit images with a clear subject on a simple background produce the best results. Generated models are a strong starting point but often benefit from cleanup — use Retopology for cleaner topology, and Layer Painting to refine textures.
Tips
- Single-subject images with a clean background work best
- For Pro mode, supplying multiple views of the same object (front, side, back) dramatically improves accuracy
- Chain with Image Generation: generate a concept image, then immediately convert it to 3D
Segment to 3D
Isolate specific objects from an image and convert each one into an individual 3D model, assembled into a scene.
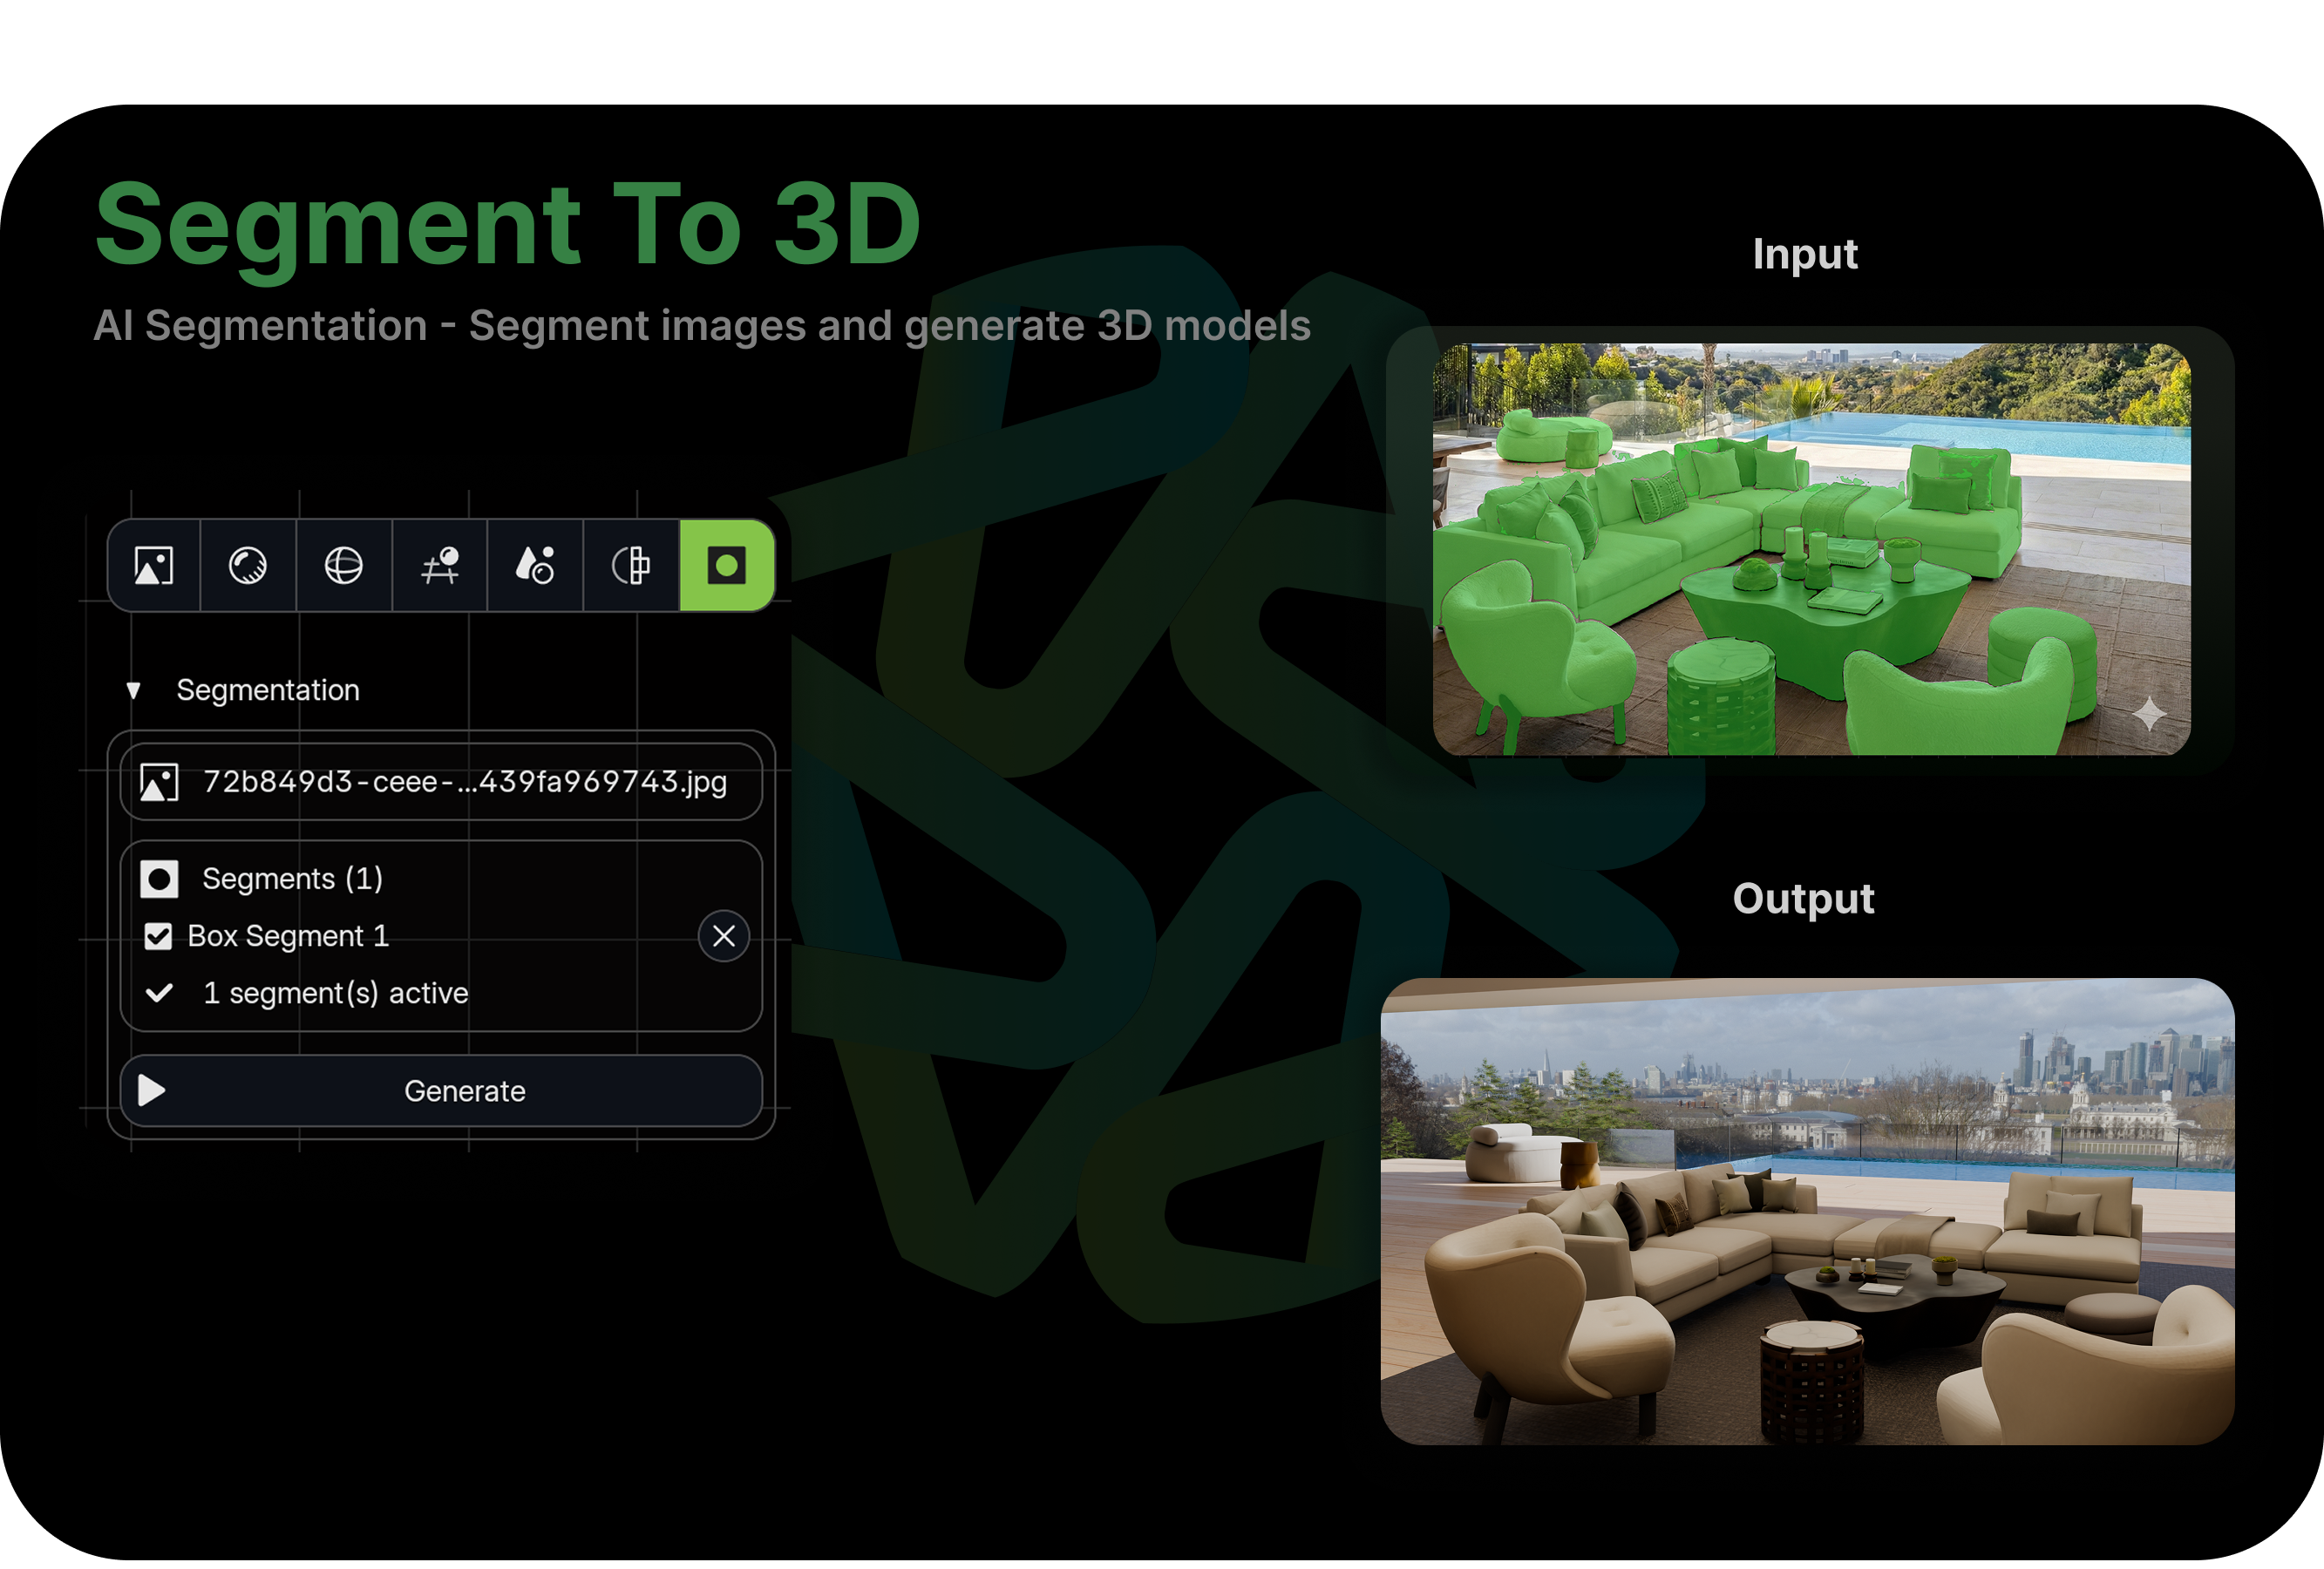
Unlike Image to 3D which converts the entire image into a single mesh, Segment to 3D lets you pick and choose — select the objects you care about, and Mixar will extract each one separately, generate individual 3D models, and place them in your scene with correct spatial relationships.
How it works
- Add your source image to the moodboard and select it
- Open the Segment to 3D panel from the AI function menu or sidebar
- Use the Mask Tools in the toolbar to identify objects:
- Box Mask — Draw a rectangle around an object. Mixar's AI (SAM) automatically refines the box into a precise object mask
- Magic Select — Click directly on any object in the image. SAM instantly segments it into a clean mask
- Each selection creates a segment — toggle segments active or inactive in the sidebar list to choose which objects to convert
- Click Generate — each active segment is converted to a 3D model
- All generated models are placed in a scene, preserving their spatial relationships from the original image
When to use it
- Scene reconstruction from reference photos — Extract individual furniture, props, or architectural elements as separate 3D objects
- Selective extraction — You only need the chair from the reference, not the entire room
- Modular scene building — Objects become independent meshes you can rearrange, rescale, or replace
Generate Scene
Convert an entire image into a full 3D scene with multiple objects, all at once.

While Segment to 3D lets you handpick which objects to extract, Generate Scene automates the entire process. Mixar analyzes the image, identifies all the objects, segments them automatically, generates 3D models for each one, and assembles them into a complete scene.
How it works
- Add your source image to the moodboard
- Select Generate Scene from the AI function menu
- Mixar automatically analyzes the image to understand what objects are present, segments each one, generates a 3D model for every identified object, and places all models in a scene matching the original image
- The complete scene appears in your 3D viewport, ready to work with
How it compares to Image to 3D
| Feature | Image to 3D | Generate Scene |
|---|---|---|
| Output | One mesh | Multiple meshes arranged in a scene |
| Object detection | None (entire image as one subject) | Automatic (identifies all objects) |
| Spatial layout | Single object, no scene context | Full scene with object placement |
| Best for | Individual assets | Environment and scene creation |
Retopology
Simplify high-poly meshes into clean, lower-poly versions while preserving the visual shape.
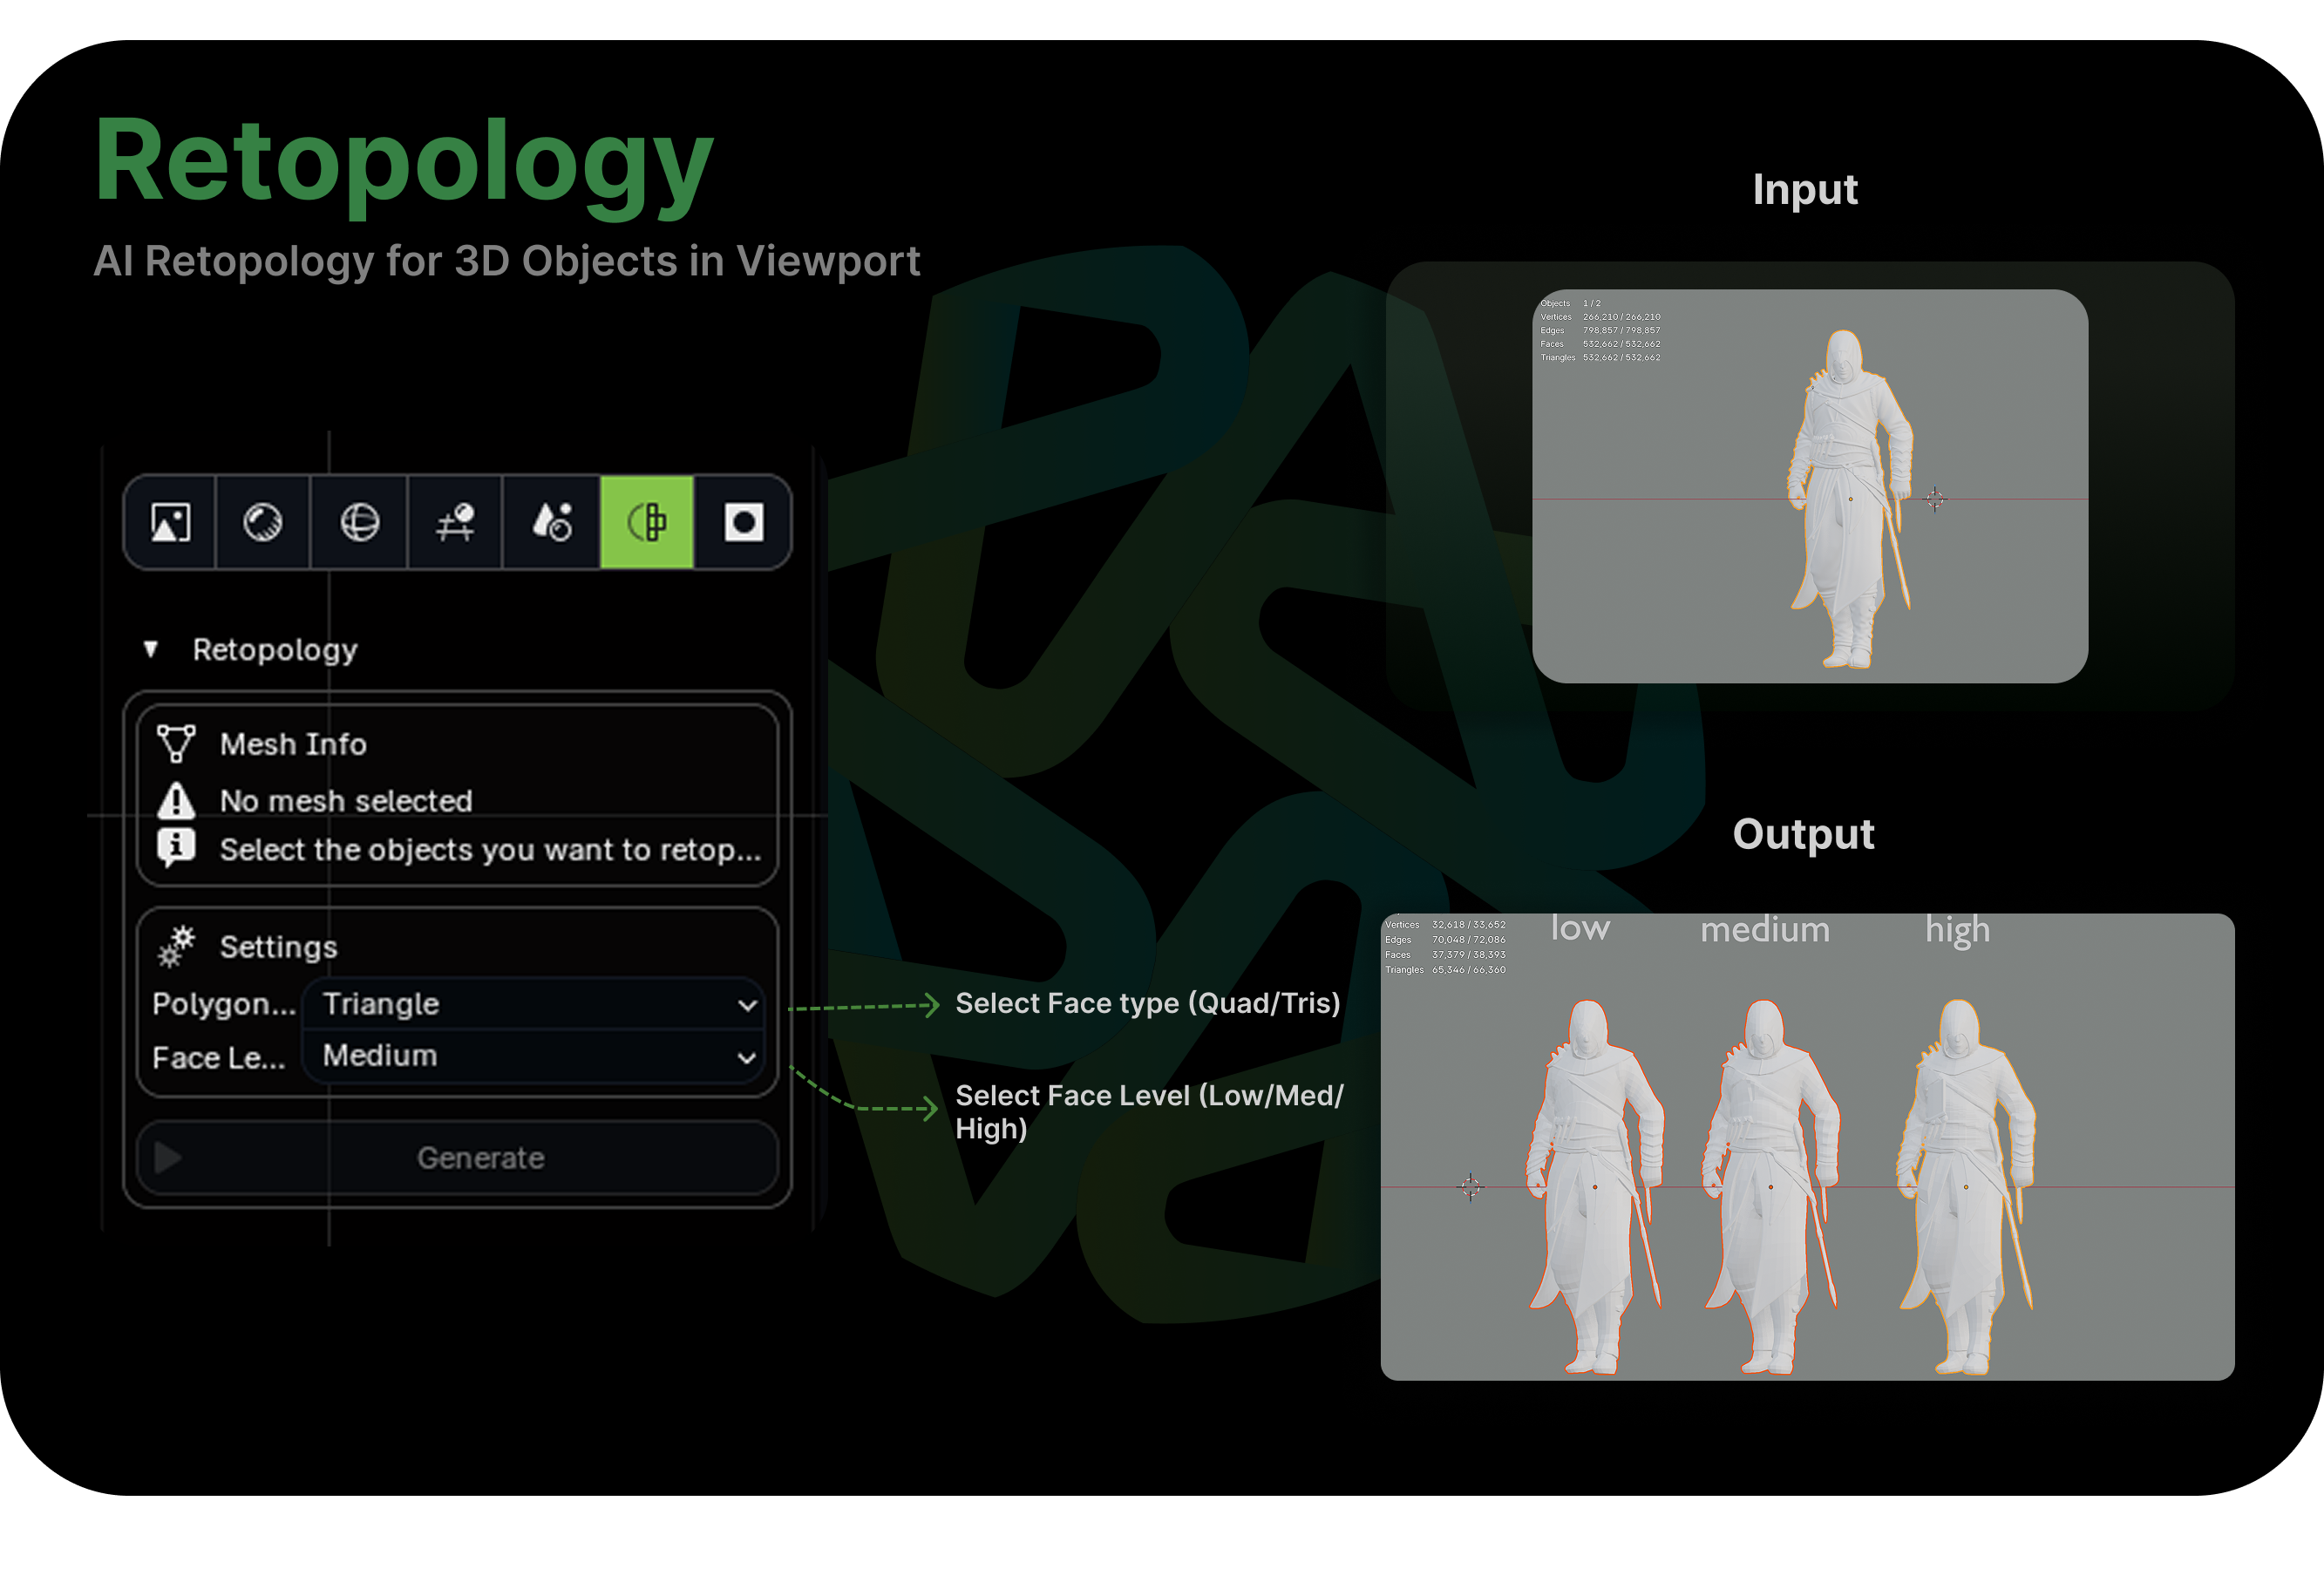
Whether you're working with a scan, a sculpt, or an AI-generated mesh with messy topology, Retopology takes your high-poly input and produces a cleaner, more efficient version. This is essential for getting meshes ready for animation, game engines, or any context where polygon count matters.
How it works
- Select the high-poly mesh you want to retopologize
- Choose Retopology from the moodboard
- Mixar processes the mesh and generates a simplified version that reduces polygon count, preserves the overall shape and silhouette, and produces cleaner edge flow
- The retopologized mesh is added to your scene
When to use it
- After Image to 3D or Generate Scene — AI-generated meshes often have dense, irregular topology. Retopology cleans them up for production use.
- Sculpt cleanup — Take a high-poly sculpt and get a usable base mesh
- Performance optimization — Reduce polygon counts for game assets, AR/VR, or real-time applications
- Animation preparation — Clean topology is essential for deformation and rigging
Layer Painting
Mixar's built-in texturing system. If you've used Substance Painter, Armorpaint, or any layer-based image editor, the workflow will feel familiar — but it's integrated directly into your 3D environment with no export/import roundtrip. Build materials by stacking layers, each contributing to any PBR channel, with full mask and blend mode control.
PBR Channels
Every material in Mixar is defined by standard PBR (Physically Based Rendering) channels:
- Base Color — The surface's diffuse color, independent of lighting. What the material "looks like" in neutral light.
- Roughness — How smooth or rough the surface is. 0 is a perfect mirror, 1 is completely matte. Most real-world materials fall between 0.2 and 0.8.
- Metallic — Whether the surface is metallic (1) or non-metallic (0). In practice, almost always either 0 or 1.
- Normal — Surface detail that affects how light bounces without changing actual geometry. Scratches, pores, dents — anything too fine for mesh geometry.
You can also add additional channels like Height (displacement), Ambient Occlusion, and Emissive depending on your project.
Layer Types
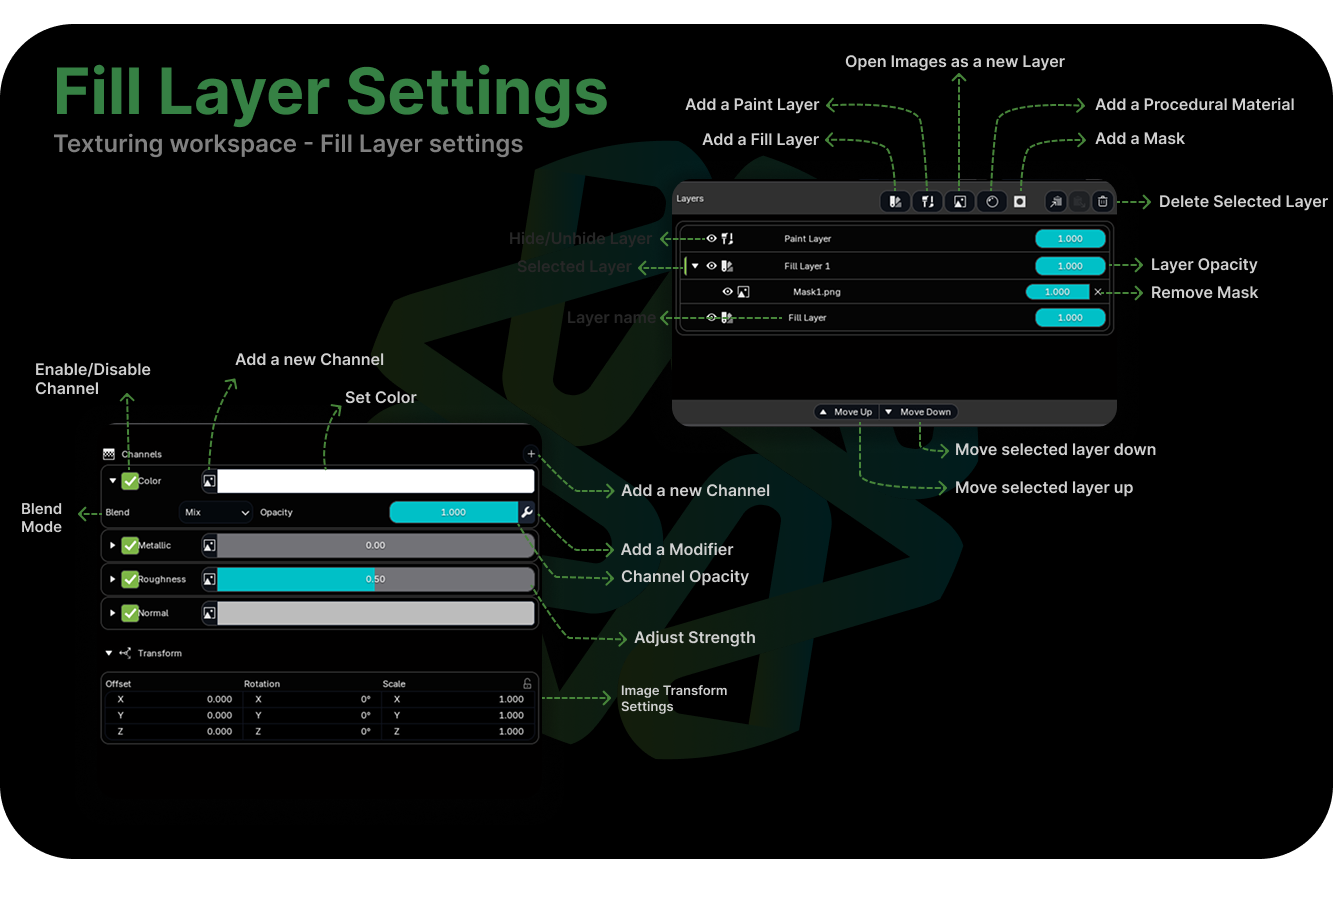
Fill Layer
A uniform value or image applied across the entire mesh (or masked region). Use fill layers for base material colors, flat property values, or loading image textures as the base.
Paint Layer
A layer you paint on directly in the 3D viewport using brushes. Use paint layers for hand-painted detail — edge wear, dirt accumulation, color variation, and artistic touches that procedurals can't handle.
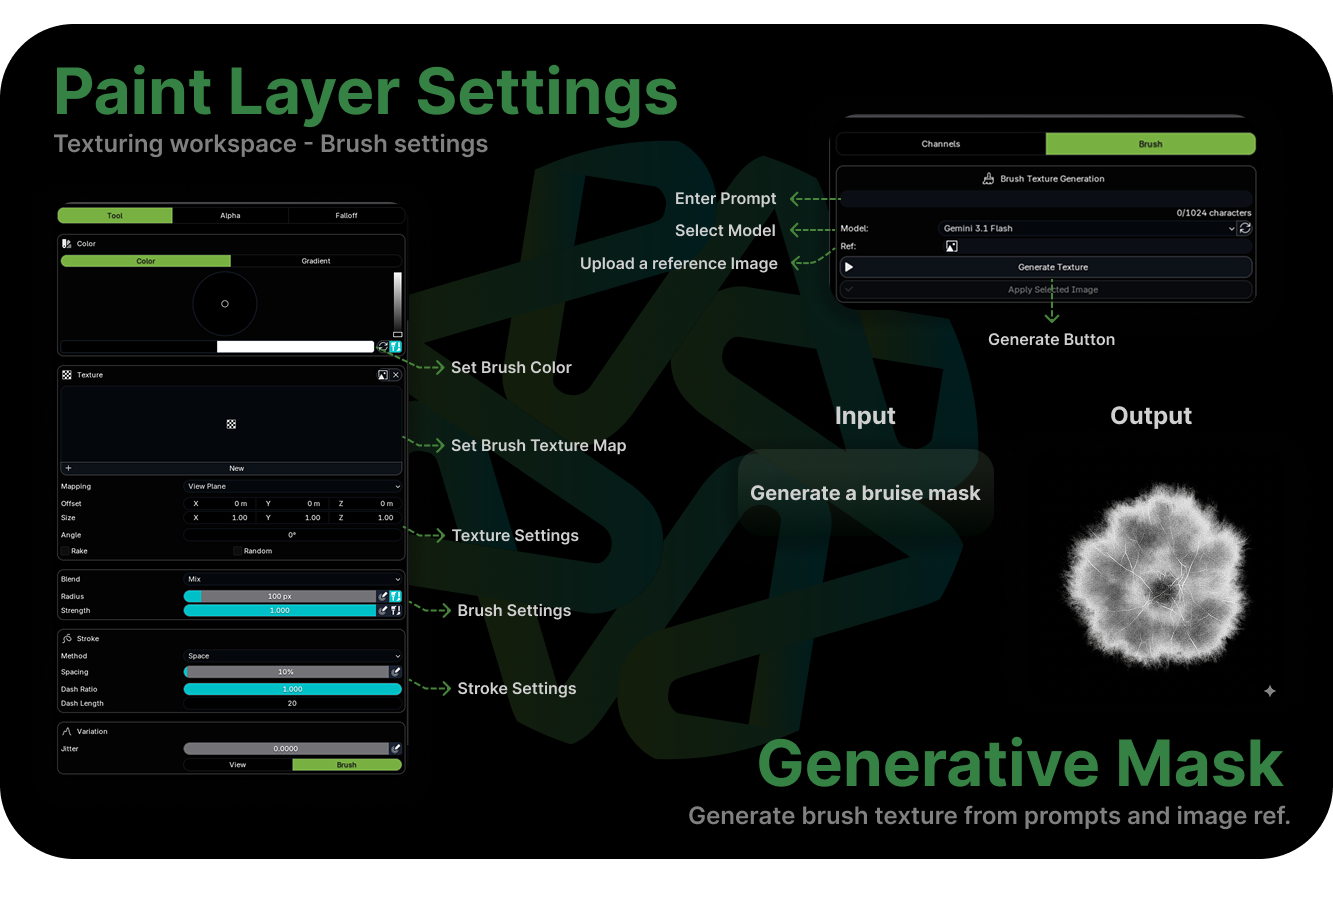
Image as Channel Maps
Import existing texture maps (from a scan, another tool, or AI generation) and assign them to specific PBR channels. Use these when you already have textures from another pipeline or when you've generated PBR maps using the Moodboard and want to load them as layers for further refinement.
Building a material — typical layer stack
- Fill Layer — Base — Set the overall color, roughness, and metallic values. This is your foundation.
- Fill Layer — Primary Texture — Load an image texture or procedural pattern for the main surface detail.
- Fill Layer — Weathering — Add wear and aging effects. Use procedural masks (AO, curvature, edge detect) so effects follow the geometry naturally.
- Paint Layer — Manual Detail — Paint specific details — logos, unique damage marks, artistic accents.
- Fill Layer — Final Adjustments — Subtle overall tweaks to roughness or color balance.
Each layer has per-channel controls: color, roughness, metallic, and normal can be set independently per layer, with their own blend modes and opacity.
Masks
Every layer can have one or more masks that control where the layer is visible. Where the mask is white, the layer shows through. Where it's black, the layer is hidden.
Mask types
- Painted — Paint directly to reveal or hide parts of a layer
- Image-based — Use an imported image as a mask
- Procedural — Generated from patterns (noise, bricks, checker, voronoi, waves) or mesh data (ambient occlusion, edge detection, curvature)
- Geometry-driven — Use baked mesh maps like AO, cavity, or curvature. This is how you get effects like "dirt accumulates in crevices" or "edges wear down to bare metal"
Masks also support modifiers — invert, ramp (remap values with a color curve), and curve adjustments — for fine-tuning without repainting.
Blend modes
- Mix — Standard alpha blending. The default for most layers.
- Multiply — Darkens. Great for shadow layers, AO overlays, and dirt.
- Screen — Lightens. Useful for highlights and glow effects.
- Overlay — Adds contrast. Good for adding variation to an existing base.
- Add / Subtract — Direct value adjustment. Useful for tweaking roughness or metallic values.
Painting
When a Paint Layer is active, you paint directly on your mesh in the 3D viewport. The brush system gives you full control:
- Radius — Brush size in pixels
- Strength — Paint intensity per stroke
- Blend mode — How the brush blends with existing content
- Falloff — How strength decreases from center to edge (smooth, sharp, linear, or custom curve)
- Stroke type — Spacing, airbrush, line, curve
- Texture — Apply a texture pattern to the brush tip for natural variation
- Alpha mask — Shape the brush tip with a mask texture
Painting tips
- Use low strength (0.1–0.3) and build up gradually for natural-looking results
- Paint on a separate layer for each type of detail — keeps everything editable
- Use the Normal Falloff setting to prevent painting on surfaces angled away from the camera
Mesh Baking
Bake mesh-based maps that capture information about your geometry. These are primarily used as mask inputs for your layer stack.
- Ambient Occlusion — Shadows in crevices and contact areas
- Curvature (Pointiness) — Detects edges and convex surfaces
- Cavity — Identifies concave areas
- Dust — Simulates dust accumulation based on surface orientation
- Bevel — Simulates rounded edges without adding geometry
- Position — World-space position for procedural gradients and effects
For example: bake an AO map, then use it as a mask on a dirt layer so grime accumulates in crevices naturally. Or use curvature to create edge wear that follows the actual shape of your model.
Baking & Export
When your material is complete, bake the entire layer stack down to standard texture maps:
- Bake All Channels — Renders every layer into final per-channel texture maps (Color, Metallic, Roughness, Normal)
- Preview — Inspect each baked channel individually to verify quality
- Export — Save maps as image files for use in game engines, renderers, or other applications
The baked output is standard PBR texture maps that work with any modern rendering pipeline — Unreal, Unity, Godot, Arnold, V-Ray, Cycles, or any engine that supports PBR materials.
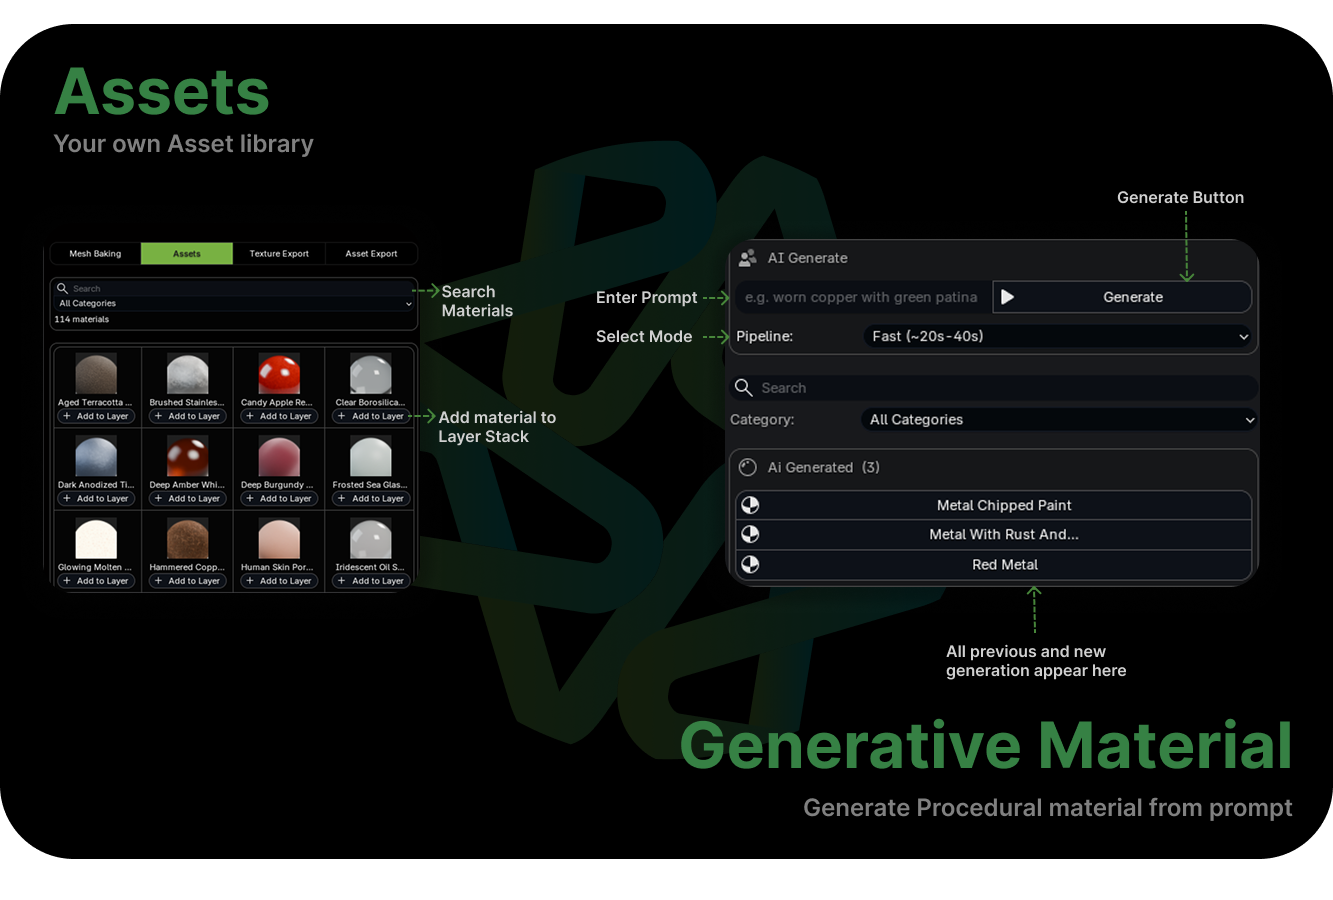
Material Assets
Mixar includes a built-in library of procedural materials — wood, metal, fabric, stone, brick, ceramic, and more. Browse by category, search by name, and apply to any layer with a single click. They're fully procedural, so they adapt to any UV layout and can be customized through their properties.
Putting It All Together
Mixar's features are designed to flow into each other. Here are some common end-to-end workflows.
Concept to Finished Asset
- Image Generation — Generate concept art from a text description
- Image to 3D — Convert the best concept into a 3D model
- Retopology — Clean up the mesh topology
- Modeling — Refine geometry, fix any issues
- UV Editing — Unwrap and pack UVs
- PBR Map Generation — Generate initial textures
- Layer Painting — Refine materials, add detail
- Export — Bake and export final texture maps
Photo to 3D Scene
- Import a reference photo to the moodboard
- Generate Scene — Convert the entire photo into a 3D scene
- Retopology — Simplify meshes as needed
- Layer Painting — Refine materials on each object
- Adjust placement, lighting, and camera
Quick Blockout Exploration
- Model a rough blockout using basic shapes
- Blockout to Render — Generate multiple style variations
- Use the renders to align on art direction
- Proceed to detailed modeling and texturing
Keyboard Shortcuts
The most frequently used shortcuts across Mixar's workspaces.
Transforms
Selection
Viewport
UV Editor
Moodboard
Moodboard AI Features
This documentation covers Mixar 2.0. Features are continuously being improved and expanded.